console.log(JSON.stringify(chemicaltools.searchElement("Hf")));// {"number":"72","name":"铪","symbol":"Hf","mass":"178.5","iupac":"Hafnium","origin":"Hafnia, the New Latin name for Copenhagen","pinyin":"ha","url":"https://i.loli.net/2018/03/31/5abf7a90c8da6.png"}console.log(JSON.stringify(chemicaltools.calculateMass("C6H12O6")));// {"name":"C6H12O6","mass":180.156,"peratom":[{"name":"氢","iupac":"Hydrogen","symbol":"H","atomnumber":12,"mass":"1.008","massper":6.714181043095984},{"name":"碳","iupac":"Carbon","symbol":"C","atomnumber":6,"mass":"12.01","massper":39.99866782122161},{"name":"氧","iupac":"Oxygen","symbol":"O","atomnumber":6,"mass":"16","massper":53.28715113568241}]}console.log(JSON.stringify(chemicaltools.calculateGas(p=3,V=1,n=1)));// {"p":3,"V":1,"n":1,"T":0.36083714216983404}console.log(JSON.stringify(chemicaltools.calculateAcid(0.1,[2,7],true)));// {"c":0.1,"pH":1.5683850420032601,"ion":[{"name":"H+","c":0.027015621187203295},{"name":"H2A","c":0.07298430582855843},{"name":"HA-","c":0.027015594171541573},{"name":"A2-","c":9.999989999984995e-8}]}console.log(JSON.stringify(chemicaltools.calculateDeviation([2.232,2.455,2.742,2.535,2.362])));// {"input":[2.232,2.455,2.742,2.535,2.362],"average":2.4652000000000003,"average_deviation":0.13864,"relative_average_deviation":0.05623884471848126,"standard_deviation":0.05160000000000009,"relative_standard_deviation":0.3721869590305834}console.log(JSON.stringify(chemicaltools.makeQuestion("name","iupac")));// {"question":"铍","options":["Beryllium","Gallium","Lanthanum","Platinum"]}console.log(JSON.stringify(chemicaltools.correctAnswer("铷","Rubidiutm","name","iupac")));// {"correct":false,"question":"铷","correct_answer":"Rubidium","answer":"Rubidiutm"}
A simple graphics ray tracer coded in Rust. You can use it as a learning tool or as guidance when creating a similar ray tracer 🙂
The ray tracer is compatible with the online course “CS184.1x Foundations of Computer Graphics” at edX, supporting the scene setup file format used there (description of the scene to be traced). I completed the course with a C++ ray tracer, but due to respect for the teachers of the course I’ll not post that code, as C++ is the “official” course programming language. If you do use this repository to help you with that course, DO learn from it and DON’T simply copy work.
Features
Sphere, Triangle and Plane intersection routines (extendable to general convex polygons)
Point and directional lights (as well as ambient light)
Matrix transformations (translate, scale, rotate) for collisions in object space
Shadows and reflections
Phong reflection model (plus emission value)
Perspective camera with field-of-view
Support for scene description files (containing the scene setup)
Does not include refraction, soft shadows, cone lights, texture support, more complex surfaces (think cylinders and cones) or fancy global illumination techniques. It is also very simple regarding optimization. I took care in avoiding unnecessary computations, but didn’t implement any optimizations that are essential for a fast ray tracer, such as bounding boxes or other partition schemes.
Compilation / Execution
Fast:
cargo run --release
Debug:
cargo run
Known issues
The scene configuration files use PNG as the image output format, but this ray tracer saves the images as BMP (but still with the .png extension).
Generating the image for scene7.test probably takes a few hours, as the raytracer is simply not optimized enough.
Kebab is a browser automation solution. It brings together the power of WebDriver, the robustness of Page Object modelling and the expressiveness of the Kotlin language.
not Groovy.
Note
Experimental version
It cannot recommended to use in production now.
Usage
Configuration
val config:Configuration by lazy {
configuration {
baseUrl ="http://www.google.co.jp/"
driver =ChromeDriver()
options {
timeout {
implicitlyWait =10L to TimeUnit.SECONDS
}
}
}
}
The different point is Kebab is light weight.
Geb has wide range feature. But Kebab is simple feature,not exhaustive.
How to contribute
Build Environment
Kebab builds with Gradle. You do not need to have Gradle installed to work with the Kebab build as Gradle provides an executable wrapper that you use to drive the build.
On UNIX type environments this is gradlew and is gradlew.bat on Windows.
For example to run the Kebab test suite for the entire project you would run…
Trump tweets a lot. It’s repetitive and often non-sensical—perfect for a Markov model! NOTE: this bot uses a Markov chain package. If you’d like to see my hand-implemented version, seeMarkovTweets.
Requirements:
Python 3.5+
Tweepy API credentials
Markovify package
Where’d the tweets come from?
While Trump tweets a lot, he often deletes things, too. Someone came up with the idea of archiving all of his tweets and making them easily downloadable. Using a JSON file downloaded from there on January 3rd, 2019, I wrote prepare_corpus.py to comb through and remove fodder (links to websites and manual retweets) and combine all the tweets into a corpus. A small TwitterBot class I wrote was then used host a markov model created by jsvine’s markovify package.
Twitter API credentials
In order to use the bot, you must have your own credentials from Twitter’s developer site and place them in a file called keys.py as a dictionary object called key. Additionally, you’ll need the tweepy module.
See below for that.
Although twitter limits the number of tweets you can scrape to 3200, you can emulate someone’s tweets off of that!
Use tweet_as to select any (public) twitter user and create some tweets from them!
$ tweet_as realdonaldtrump
generating markov model for realdonaldtrump with up to 3200 tweets!
corpus size: 42615 characters

...I campaigned on Border Security for other countries - taking advantage of U.S. troops from the Never Ending Wars.
After many years ago.
Many stories, like with the Shutdown and finish funding.
This is exactly what he promised, and I in Iraq and Germany.
Here we go with Mitt Romney, but so is the wheel.
Do you think it's just luck that gas prices are low and expected to go down this year.
I also look forward to my next summit with Chairman Kim!
Dr. Sebastian Gorka, a very long time.
If we had a Wall, calling it old fashioned.
No thanks to the truth of the Witch Hunt is the Fed.
Have the Democrats that there was a great Christmas!
A REAL scandal is the greatest Country in the Oval Office right now.
These great Americans left their jobs to serve in the first place!
The reporting has been reported by the media.
We brought or gave NO hats as the Fake News tries so hard & getting so little credit!
I am in the Oval Office right now.
Go back to Washington from all parts of the resources that he is a total Obstruction of Justice.
2018 is being fixed!
OpenOSRS is a fully open-source client with no restrictions. We are not affiliated with Jagex or RuneLite.
This is a special branch that uses the upstream client (RuneLite) with the OpenOSRS injector. (bundled)
From the root module, run the following gradle tasks: clean build run
This branch is still in bringup but most functionality works as intended.
This branch uses upstreams PlayerManager/OverlayManager etc so keep that in mind if porting a plugin.
Contributions are welcome, but there should be no changes made to runelite-client unless necessary/minor. Mould the api around the client.
Discord
Project Layout
cache – Libraries used for reading/writing cache files, as well as the data in it
deobfuscator – Can decompile and cleanup gamepacks as well as map updates to newer revs
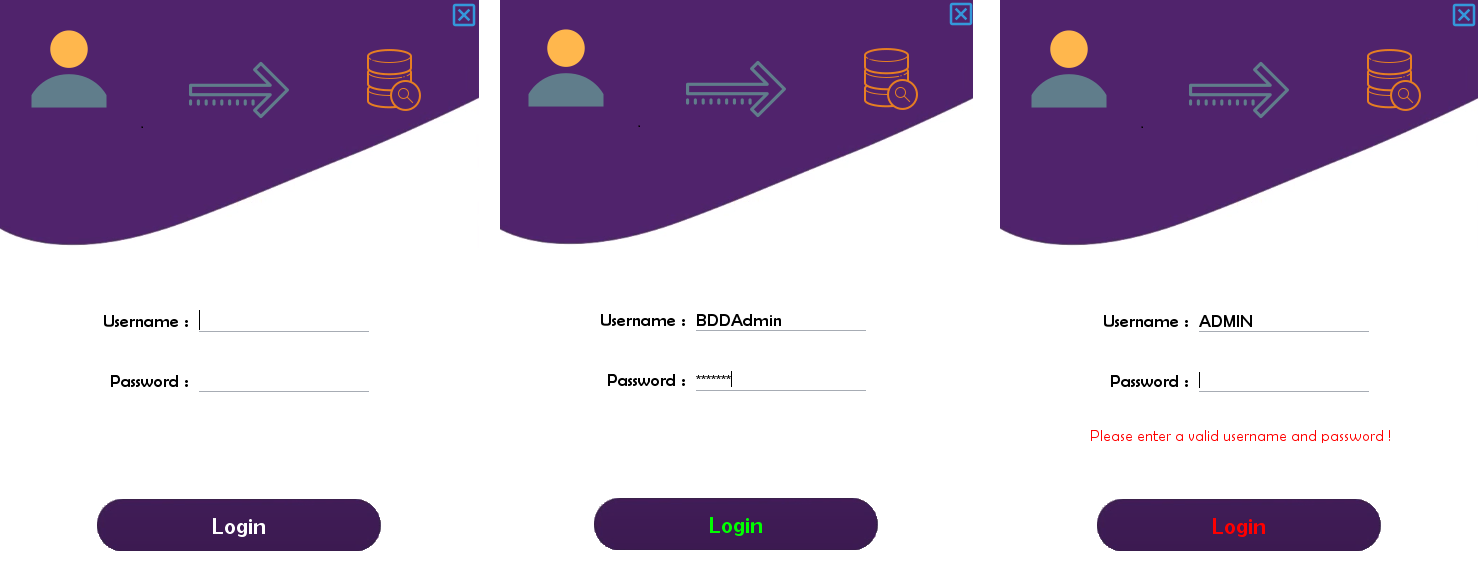
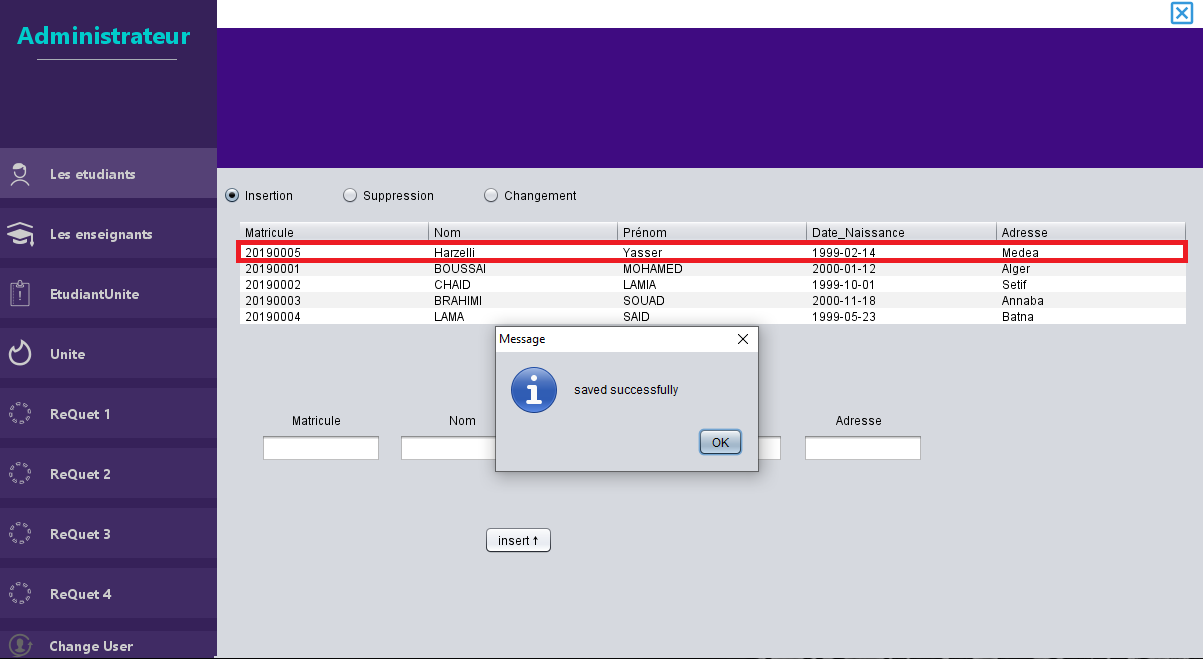
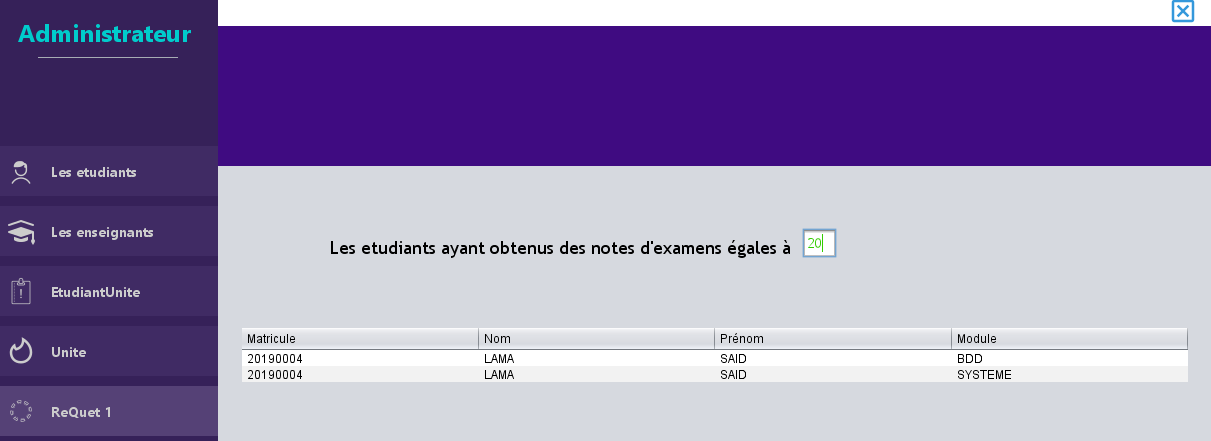
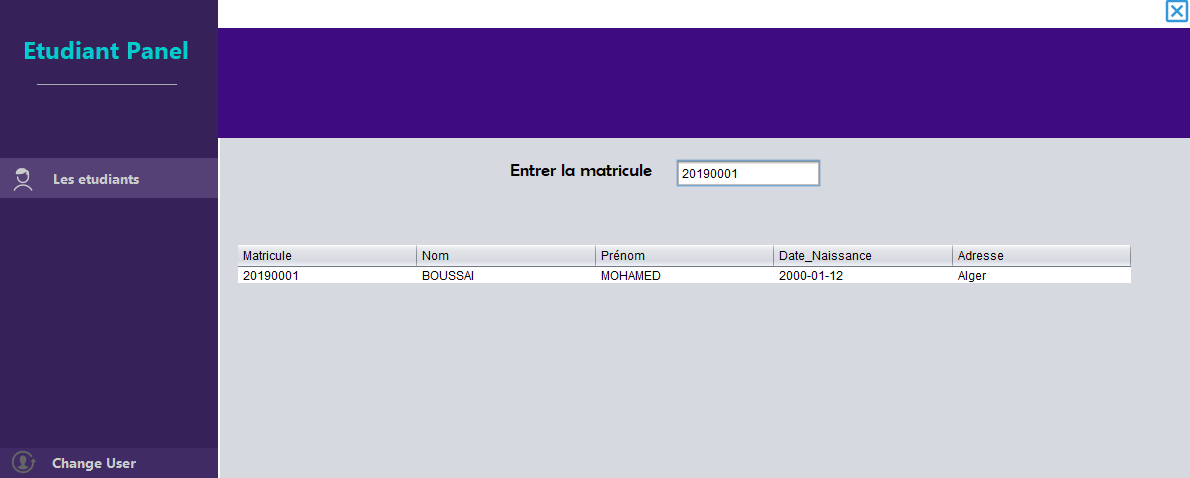
Pour plus de détails et de captures d’écran sur cette application, j’ai fait un rapport expliquant chaque page avec le code associé.
Téléchargez-le en pdf ici :
This sample tool provides an example of how to programmatically create, update, and delete SAP Data Warehouse Cloud artifacts. The tool, referred to as provisioner, is written in Python and demonstrates how to automate various SAP Data Warehouse Cloud provisioning activities. The provisioner can perform the following actions against SAP Data Warehouse Cloud tenants:
create and remove spaces with a simplified command line
bulk create and remove spaces using a CSV file
create and remove connections in one, or many spaces
create and remove shared objects from one space to another
create scripts of multiple commands
generate a HANA tables for monitoring and analytics
2.0 – Requirements
Before installing andrunning the provisioner, the following configurations and 3rd party components must be available.
2.1 – Required
SAP Data Warehouse Cloud administrator access, i.e., user with DW Administrator privilege
To retrieve the provisioner from GitHub, the command line version of Git is an easy way to download the project to a local directory. The project may also be downloaded from GitHub as a zip file using a browser.
C:\>git --version
git version 2.37.0.windows.1
C:\>
4.0 – Download
Clone or download this repository to a directory. In all the examples in this README, a sub-directory named “tools” will be used as the starting location for all operations.
The commands to download the project are similar for all major operating systems, i.e., Linux, Windows, and Mac OS X.
4.1 – Git Download
The provisioner is available on the SAP-samples Github repository: DWC Provisioner. The tool can be downloaded as a zip file from Github or the tool can be cloned directly from Github using one of the following commands.
Ubuntu Linux:
From the home directory of the user ubuntu:
ubuntu@myhostname:~$ mkdir tools
ubuntu@myhostname:~$ cd tools
ubuntu@myhostname:~/tools$ git clone https://github.com/SAP-samples/dwc-provisioner
Using a browser, navigate to the SAP-samples/dwc-provisioner repository and click the “Download ZIP” button. Save or move the ZIP file to the “tools” sub-directory and unzip the contents.
5.0 – Optional Python setup
Python allows you to create “virtual environments” to help manage dependencies between installed packages and the versions of packages used in a specific project. It is a best practice to create a virtual environment for each project. Without a virtual enviroment, all Python packages are installed in the “global” space and all projects share the same package versions.
5.1 – Install the Python virtual environment tool.
Ubuntu
sudo apt install python3-venv
Windows/MacOS
python -m pip install --user virtualenv
5.2 – Configure a virtual environment
Python virtual environments must be explicity created and activated. The following command create a Python virtural environment in the dwc-provisioner directory.
ubuntu@ip-17-1-83-11:~/tools$ cd dwc-provisioner
ubuntu@ip-17-1-83-11:~/tools/dwc-provisioner$ python3 -m venv .venv
5.3 – Activate the virtual environment
Python virtual enviroments must be activated each time in a command/terminal window before using Python.
Ubuntu / Linux / Mac OS
Non-windows platforms activate the virtual enviroment by “sourcing in” the necessary enviroment to the current shell.
If the environment is activated correctly, a previx (.venv) is shown in the command line:
(.venv) c:\devpath\dwc-provisioning>
6.0 – Install Python packages
The provisioner requires publically available Python packages to be installed before running the tool. The packages are quickly installed using the following command:
To create and store information about SAP Data Warehouse Cloud in an SAP HANA Cloud instance, ensure the IP address where this tool runs is in the allow list for SAP HANA Cloud connections. In the example below, an SAP Data Warehouse Cloud Data Access User (a.k.a., hash-tag (#) user) is the target, so in SAP Data Warehouse Cloud set the IP Allow list under the System / Configuration tab.
8.0 – Provisioner Configuration
To start using the provisioner, a configuration file is created to identify the target SAP Data Warehouse Cloud tenant and set the username and password values.
Refer to the following sections on command syntax for additional information on the config command.
This command saves connection information for both an SAP Data Warehouse Cloud tenant and optionally an SAP HANA Cloud (or on-premise) database. After running this command, a new configuration file named config.ini is created in the current working directory.
Note: the config command does not validate the tenant or SAP HANA configuration values.
Parameter
Values
–dwc-url
Target SAP Data Warehouse Cloud tenant
–dwc-user
User name with administrative privileges on the tenant
–dwc-password
Password for the user specified in the –dwc-user parameter
–hana-host
HANA host name
–hana-port
HANA port
–hana-user
HANA username
–hana-password
HANA password
–hana-encrypt
Include the option to encrypt SAP HANA communications (default=False)
–hana-sslverify
Validate the HANA certificate (default=False)
Examples:
Set the configuration for the SAP Data Warehouse Cloud tenant:
Set both the SAP Data Warehouse Cloud and HANA Data Access user credentials. This example connects to the SAP Data Warehouse Cloud tenant and a Data Access User named PROVISIONER defined in the space ADMINSPACE, i.e., ADMINSPACE#PROVISIONER.
seach user names or emails on substring (default = false)
-d, –directory
directory for output
-q, –query
query users as substring searches
userName
user name(s) to list, separated by spaces
Examples:
List all the users in the tenant to the console.
provisioner users list
List all the user and output the information in CSV format to the specified output directory. The output file names will be DWC_USERS.csv and DWC_USERS_role_members.csv.
provisioner users list -f csv -d c:\temp
Search the users in the tenant for users with “sap.com” appearing anywhere in their definition (including email), as well as any user with the word “greynolds” in their definition.
provisioner users list -S sap.com greynolds
9.2.2 – Command: users create
Work in progress
9.2.3 – Command: users delete
Work in progress
9.3 – Command: spaces
The spaces command can create, delete and list spaces in the tenant.
9.3.1 – Command: spaces list
The spaces list command queries the SAP Data Warehouse Cloud tenant for details for all spaces, specific spaces, or substring searches of available spaces. If no space ids are provided, all spaces in the tenant will be included. For instance, adding the --query flag with a space id of “TRAINING” finds spaces with names such as “TRAINING_LOB”, “FINANCE_TRAINING”, and “HRTRAINING”.
Parameter
Description
-f, –format
output style: ‘hana’, ‘csv’, ‘json’, ‘text’
-p, –prefix
prefix for output, default=”DWC_SPACES”
-q, –query
seach space names on substring (default = false)
-d, –directory
filename for output
spaceID
space id(s) to list
Examples:
List all spaces in the tenant to the console.
provisioner spaces list
List all spaces containing the word “TRAINING” and the space containing “FINANCE_DATA.”
provisioner spaces list TRAINING FINANCE_DATA
List all the spaces to HANA tables.
provisioner spaces list --format hana
9.3.2 – Command: spaces create
The spaces create command creates a new space in the SAP Data Warehouse Cloud tenant. If the –template option is specified, the provided space ID is used to lookup an existing Space to use as a template.
Parameter
Description
-b, –businesss
optional business name to assign – defaults to spaceID
-t, –template
space id to use as a template
-d, –disk
disk allocated to space
-m, –memory
memory allocated to space
-f, –force
force the re-creation if space exists
spaceID
space id to create
users
users to add to the space
Examples:
Create a new space using only command line options having 1 GB of disk storage and .5 GB of in-memory storage.
The spaces bulk command creates or deletes multiple spaces using a CSV file to provides the
list of spaces. For bulk create operations, the CSV file must have the following columns:
Space Id, Business Name, Disk, Memory, Template, Force, User 1, User 2, User 3, etc
Note: Any number of users for a space may be included as comma separated values.
For bulk delete operations, only the space ID column is required – all other values are ignored.
9.3.4.1 – Command: spaces bulk create
Create spaces defined in a CSV file.
Parameter
Description
-s, –skip
header lines to skip in the CSV file, default=”1″
-f, –force
force the re-creation if space exists
-t, –template
Space ID to use as a template if not specified per space
This command is similar to the spaces delete command and is intended to quickly delete the spaces created with the spaces bulk create command. The CSV file requires only 1 column containing the space IDs to be deleted.
The space members can command list existing space members, add members to a space, or remove members from a space.
9.3.5.1 – Command: spaces member list
List the members in one or more spaces.
Parameter
Description
-q, –query
seach space names on substring (default = false)
-f, –format
output style: ‘hana’, ‘csv’, ‘json’, ‘text’
-p, –prefix
prefix for output, default=”DWC_SPACES”
-d, –directory
filename for output
spaceID
space id(s) to list
Example:
List the members in all spaces in the tenant.
provisioner spaces members list
List the members for two spaces: MYSPACE and FINANCE_DATA.
provisioner spaces members list MYSPACE FINANCE_DATA
List the member of all spaces having the word TRAINING in the space ID and FINANCE_DATA.
provisioner spaces members list --query FINANCE_DATA TRAINING
9.3.5.2 – Command: spaces member add
Add a tenant one, or more users to an existing space. By default, this command expects “USER ID” values; the “USER ID” values are not email addresses. To include users by either “USER ID” or email address, use the –query option to search for users based on the provided string.
Parameter
Description
-q, –query
seach space names on substring (default = false)
spaceID
space id(s) to list
user
one or more user names to add to the space
Examples:
Add a user to a space.
provisioner spaces member add MYSPACE MGREYNOLDS
Add multiple users to a space.
provisioner spaces member add MYSPACE MGREYNOLDS BSMITH
Add multiple users have email addresses containing “mycompany.com” to a space.
provisioner spaces member add --query MYSPACE mycompany.com
9.3.5.3 – Command: spaces member remove
Remove one, or more tenant users from an existing space. By default, this command expects “USER ID” values; the “USER ID” values are not email addresses. To users users by either “USER ID” or email address, use the –query option to search for users based on the provided string.
Parameter
Description
-q, –query
seach space names on substring (default = false)
spaceID
space id(s) to list
user
one or more user names to remove to the space
Examples:
Remove a user from a space.
provisioner spaces member remove MYSPACE MGREYNOLDS
Remove multiple users from a space.
provisioner spaces member remove MYSPACE MGREYNOLDS BSMITH
Remove multiple users have email addresses containing “mycompany.com” to a space.
provisioner spaces member remove --query MYSPACE mycompany.com
9.4 – Command: shares
9.4.1 – Command: shares list
9.4.2 – Command: shares create
9.4.3 – Command: shares delete
9.5 – Command: connections
The connections command can list, create, and delete connections from spaces. Spaces may be explicitly identified by ID or searched for based on a search strings.
List the connections from spaces having “TRAINING” in the space ID.
provisioner connections list --query TRAINING
List the specific connection “HANA on-premise” in all spaces.
provisioner connections list --connection "HANA on-premise"
9.5.2 – Command: connection create
9.5.2 – Command: connection delete
10.0 – Uninstall
To uninstall simply remove the dwc-provisioner directory, including all sub-directories
11.0 – Errata
11.1 – Known Issues
This example application is in an early stage of development, so
don’t store personal information because of missing access logging
don’t store sensitive information because there is no access control
don’t use the example application productively because users and passwords generated by the config command, while obfuscated, are not securely encrypted.
don’t expect always meaningful error messages in reaction to erroneous input.
11.2 – How to obtain support
This an example application not supported by SAP. However, you can create an issue in this repository if you find a bug or have questions about the content.
11.3 – Contributing
If you wish to contribute code, offer fixes or improvements, please send a pull request. Due to legal reasons, contributors will be asked to accept a DCO when they create the first pull request to this project. This happens in an automated fashion during the submission process. SAP uses the standard DCO text of the Linux Foundation.
Copyright (c) 2022 SAP SE or an SAP affiliate company. All rights reserved. This project is licensed under the Apache Software License, version 2.0 except as noted otherwise in the LICENSE file.


 https://github.com/chemicaltools/chemicaltools-js