This penetration testing tool allows an auditor to intercept SSH connections. A patch applied to the OpenSSH v7.5p1 source code causes it to act as a proxy between the victim and their intended SSH server; all plaintext passwords and sessions are logged to disk.
Of course, the victim’s SSH client will complain that the server’s key has changed. But because 99.99999% of the time this is caused by a legitimate action (OS re-install, configuration change, etc), many/most users will disregard the warning and continue on.
NOTE: Only run the modified sshd_mitm in a VM or container! Ad-hoc edits were made to the OpenSSH sources in critical regions, with no regard to their security implications. Its not hard to imagine these edits introduce serious vulnerabilities.
Change Log
v2.3: ???: Added support for Linux Mint 20 & Ubuntu 20.
v2.2: September 16, 2019: Fixed installation on Kali & Linux Mint 19. Fixed a double-password prompt that occured under certain conditions. Improved error logging.
v2.1: January 4, 2018: Enabled non-interactive command execution, connections to old servers with weak algorithms can now be intercepted, fixed two major bugs which caused AppArmor to kill some connections, and improved error logging.
v2.0: September 12, 2017: Added full SFTP support(!) and AppArmor confinement.
v1.1: July 6, 2017: Removed root privilege dependencies, added automatic installer, added Kali Linux support, added JoesAwesomeSSHMITMVictimFinder.py script to find potential targets on a LAN.
v1.0: May 16, 2017: Initial revision.
Running The Docker Image
The quickest & easiest way to get started is to use the Docker image with SSH MITM pre-built.
4.) Find targets on the LAN, and ARP spoof them (see below).
5.) Shell and SFTP sessions will be logged in the ssh_mitm_logs directory.
Initial Setup
As root, run the install.sh script. This will install prerequisites from the repositories, download the OpenSSH archive, verify its signature, compile it, and initialize a non-privileged environment to execute within.
Finding Targets
The JoesAwesomeSSHMITMVictimFinder.py script makes finding targets on a LAN very easy. It will ARP spoof a block of IPs and sniff for SSH traffic for a short period of time before moving on to the next block. Any ongoing SSH connections originating from devices on the LAN are reported.
By default, JoesAwesomeSSHMITMVictimFinder.py will ARP spoof and sniff only 5 IPs at a time for 20 seconds before moving onto the next block of 5. These parameters can be tuned, though a trade-off exists: the more IPs that are spoofed at a time, the greater the chance you will catch an ongoing SSH connection, but also the greater the strain you will put on your puny network interface. Under too high of a load, your interface will start dropping frames, causing a denial-of-service and greatly raising suspicions (this is bad). The defaults shouldn’t cause problems in most cases, though it’ll take longer to find targets. The block size can be safely raised on low-utilization networks.
Example:
# ./JoesAwesomeSSHMITMVictimFinder.py --interface enp0s3 --ignore-ips 10.11.12.50,10.11.12.53
Found local address 10.11.12.141 and adding to ignore list.
Using network CIDR 10.11.12.141/24.
Found default gateway: 10.11.12.1
IP blocks of size 5 will be spoofed for 20 seconds each.
The following IPs will be skipped: 10.11.12.50 10.11.12.53 10.11.12.141


Local clients:
  * 10.11.12.70 -> 174.129.77.155:22
  * 10.11.12.43 -> 10.11.99.2:22
The above output shows that two devices on the LAN have created SSH connections (10.11.12.43 and 10.11.12.70); these can be targeted for a man-in-the-middle attack. Note, however, that in order to potentially intercept credentials, you’ll have to wait for them to initiate new connections. Impatient pentesters may opt to forcefully close existing SSH sessions (using the tcpkill tool), prompting clients to create new ones immediately…
Running The Attack
1.) Once you’ve completed the initial setup and found a list of potential victims (see above), execute start.sh as root. This will start sshd_mitm, enable IP forwarding, and set up SSH packet interception through iptables.
2.) ARP spoof the target(s) (Protip: do NOT spoof all the things! Your puny network interface won’t likely be able to handle an entire network’s traffic all at once. Only spoof a couple IPs at a time):
3.) Monitor auth.log. Intercepted passwords will appear here:
sudo tail -f /var/log/auth.log
4.) Once a session is established, a full log of all input & output can be found in /home/ssh-mitm/. SSH sessions are logged as shell_session_*.txt, and SFTP sessions are logged as sftp_session_*.html (with transferred files stored in a corresponding directory).
Sample Results
Upon success, /var/log/auth.log will have lines that log the password, like this:
Furthermore, the victim’s entire SSH session is logged:
# cat /home/ssh-mitm/shell_session_0.txt
Hostname: 10.199.30.x
Username: jdog
Password: supercalifragilistic
-------------------------
Last login: Thu Aug 31 17:42:38 2017
OpenBSD 6.1 (GENERIC.MP) #21: Wed Aug 30 08:21:38 CEST 2017

Welcome to OpenBSD: The proactively secure Unix-like operating system.

Please use the sendbug(1) utility to report bugs in the system.
Before reporting a bug, please try to reproduce it with the latest
version of the code.  With bug reports, please try to ensure that
enough information to reproduce the problem is enclosed, and if a
known fix for it exists, include that as well.

jdog@jefferson ~ $ ppss
  PID TT  STAT       TIME COMMAND
59264 p0  Ss      0:00.02 -bash (bash)
52132 p0  R+p     0:00.00 ps
jdog@jefferson ~ $ iidd
uid=1000(jdog) gid=1000(jdog) groups=1000(jdog), 0(wheel)
jdog@jefferson ~ $ sssshh  jjtteessttaa@@mmaaggiiccbbooxx
jtesta@magicbox's password: ROFLC0PTER!!1juan
Note that the characters in the user’s commands appear twice in the file because the input from the user is recorded, as well as the output from the shell (which echoes characters back). Observe that when programs like sudo and ssh temporarily disable echoing in order to read a password, duplicate characters are not logged.
All SFTP activity is captured as well. Use a browser to view sftp_session_0.html. It contains a log of commands, with links to files uploaded and downloaded:
In lol.h are two defines: DEBUG_HOST and DEBUG_PORT. Enable them and set the hostname to a test server. Now you can connect to sshd_mitm directly without using ARP spoofing in order to test your changes, e.g.:
ssh -p 2222 valid_user_on_debug_host@localhost
To test out changes to the OpenSSH source code, use the dev/redeploy.sh script.
To see a diff of uncommitted changes, use the dev/make_diff_of_uncommitted_changes.sh script.
To re-generate a full patch to the OpenSSH sources, use the dev/regenerate_patch.sh script.
To summarize, you have the possibility to form a network following one of these processes :
Normal Training (x, y) : with MLP (multi-layer perceptron) and Siren
Sobolev Training (x, y, dy/dx) : with MLP and Siren
Twin_net tensorflow (x, y, dy/dx) : with MLP and Siren
Twin_net pytorch (x, y, dy/dx) : with MLP and Siren
How to train your one model?
git clone https://github.com/Tikquuss/lwd
cd lwd/scripts
(i) For achitecture made with pytorch (Normal Training, Sobolev Training and Twin_net pytorch): utils.py and functions.py
Data
The genData function takes a :
function : f(x : array), return y
its derivative: f'(i: int), takes i as parameter and returns another function that takes x and returns df(x)/dx[i]=dy/dx[i].
dim_x : dimension of x
the boundaries of the domain in which the points will be generated unify the points
the number of examples (n) to be generated
and the random seed for reproducibility
and returns (xi, yi, [dydx[j], j=1…dim_x]), i = 1….n
Example with the Styblinski-Tang function
fromutilsimportgenData, get_data_loaderfromfunctionsimportSTFunction, STDerivmin_x, max_x=-5, 5batch_size=32normalize=False# whether you want to normalize the data or not.nTrain=10000# number of examples to be generated for trainingnTest=10000# number of examples to be generated for the testINPUT_DIM=2train_seed, test_seed=0, 1# for reproducibilitybatch_samples=genData(function=STFunction, deriv_function=STDeriv, dim_x=INPUT_DIM, min_x=min_x, max_x=max_x, num_samples=nTrain, random_seed=train_seed)
x, y, dydx=zip(*batch_samples)
train_dataloader, config=get_data_loader(x=x, y=y, dydx=dydx, batch_size=batch_size, normalize=normalize)
batch_samples=genData(function=STFunction, deriv_function=STDeriv, dim_x=INPUT_DIM, min_x=min_x, max_x=max_x, num_samples=nTest, random_seed=test_seed)
x, y, dydx=zip(*batch_samples)
test_dataloader, _=get_data_loader(x=x, y=y, dydx=dydx, batch_size=batch_size, normalize=False)
Note: case of financial functions (Black & Scholes, Bachelier)
try:
%tensorflow_version1.x%matplotlibinlineexceptException:
passfromtwin_net_tfimportget_diffML_data_loader, BlackScholes, Bacheliergenerator=BlackScholes() # or Bachelier(n = INPUT_DIM) for Bachelier dimension INPUT_DIMwith_derivative=True# with dydx or nottrain_dataloader, test_dataloader, xAxis, vegas, config=get_diffML_data_loader(
generator=generator,
nTrain=nTrain, nTest=nTest,
train_seed=train_seed, test_seed=test_seed,
batch_size=batch_size, with_derivative=with_derivative,
normalize=normalize
)
If normalize = True, config will be a dictionary containing the following key-value pairs:
“x_mean”: mean of x
“x_std” : variance of x
“y_mean”: mean of y
“y_std” : variance of y
“lambda_j”, “get_alpha_beta” and “n” : see the section “How it works?” below.
If you are in dimension 2, you can visualize the curve of your function and its deviation as follows:
hyperparameters in the different loss functions to express a tradeoff between y loss and dydx loss
# Leave None and None instead of 1 and 1loss_config= {'alpha': None, "beta" : None} # loss = alpha * loss_y + beta * loss_dydxconfig.update({key : valueforkey, valueinloss_config.items() ifvalue})
Savine et al. applied the recent one-cycle learning rate schedule of Leslie Smith and found that it considerably accelerates and stabilizes the training of neural networks.
This parameter was introduced for this purpose, and remains optional (so you can override these two lines of code, and the learning rate will be used as described below).
Training, visualization of training statistics and testing
If you want to save the best model obtained during training.
name="net"# for normal and sobolev training, "twin_net" for twin_net (do not specify any other value than the last two)#name = "twin_net" # for twin_net (do not specify any other value than the last two)config["dump_path"] ="/content"# folder in which the models will be stored (left to None/False/0/"" if we don't want to save the models)config["function_name"] =""model_name=name# 'net', 'twin_net'ifname=="net" :
model_name="normal"ifnotwith_derivativeelse"sobolev"model_name+="-norm"ifnormalizeelse""model_name+="-lrs"iflearning_rate_scheduleelse""config["model_name"] =model_nameconfig["nTrain"] =nTrainconfig["batch_size"] =batch_size
fromutilsimporttrain, plot_stat, test# with_derivative = False # for normal trainingwith_derivative=True# for sobolev training and twin_net max_epoch=1000# maximun number of epochimproving_limit=float("inf") # Stop training if the training loss does not decrease n times (no limit here)model, stats, best_loss=train(
name, model, train_dataloader,
optimizer, criterion, config,
with_derivative, max_epoch=max_epoch,
improving_limit=improving_limit
)
plot_stat(stats, with_derivative=with_derivative)
(test_loss, r_y, r_dydx), (x_list, y_list, dydx_list, y_pred_list, dydx_pred_list) =test(
name, model, test_dataloader, criterion, config, with_derivative
)
If you are in dimension 2 and want to visualize the curves produced by your models :
fromtwin_net_tfimporttestastwin_net_tf_testfromutilsimportplot_statsiren=True# set to True if you want to use siren as backbonenTrain=3# number of examples to be generated for trainingnTest=3# number of examples to be generated for the testtrain_seed, test_seed=0, 1batch_size=20with_derivative=TrueHIDDEN_DIM=20N_HIDDEN=2generator_kwargs= {"hidden_units" : HIDDEN_DIM,
"hidden_layers" : N_HIDDEN}
max_epoch=2# maximun number of epochimproving_limit=float("inf") # Stop training if the training loss does not decrease n times (no limit here)ifsiren :
first_omega_0=30.hidden_omega_0=30.outermost_linear=Trueconfig.update({"first_omega_0" : first_omega_0,
"hidden_omega_0": hidden_omega_0,
"outermost_linear" : outermost_linear})
config["activation_function"] =tf.math.sinconfig["deriv_activation_function"] =tf.math.cosloss, regressor, dtrain, dtest, dydxTest, values, deltas=twin_net_tf_test(
generator, [nTrain],
nTrain, nTest,
trainSeed=train_seed, testSeed=test_seed, weightSeed=0,
deltidx=0,
generator_kwargs=generator_kwargs,
epochs=max_epoch,
improving_limit=improving_limit,
min_batch_size=batch_size,
config=config
)
plot_stat(regressor.stats["normal"], with_derivative=True)
plot_stat(regressor.stats["differential"], with_derivative=True)
If you are in dimension 2 and want to visualize the curves produced by your models :
importnumpyasnpfromutilsimportplotFunction, plotGradfromtwin_net_tfimportgraphgraph_name="Styblinski-Tang"min_y, max_y=-5, 5step_x, step_y=0.25, 0.25plotFunction(name="Styblinski-Tang Function foo foo", function=lambdax : regressor.predict_values([x])[0][0],
min_x=min_x, max_x=max_x, step_x=step_x,
min_y=min_y, max_y=max_y, step_y=step_y)
plotGrad(name="Gradient Field of Styblinski-Tang Function foo foo",
deriv_function=lambdaindex : lambdax : regressor.predict_values_and_derivs([x])[1][0][index],
min_x=min_x, max_x=max_x, step_x=step_x,
min_y=min_y, max_y=max_y, step_y=step_y)
# show_graph_per_axisyTest=dtest[1]
foriinrange(INPUT_DIM) :
xAxis=np.array([[x[i]] forxindtest[0]])
# show predicitionsgraph("%s x%d vs y"% (graph_name, (i+1)), values, xAxis, "", "values", yTest, [nTrain], True)
# show deltasgraph("%s x%d vs dxdy"% (graph_name, (i+1)), deltas, xAxis, "", "deltas", dydxTest, [nTrain], True)
For financial functions
fromtwin_net_tfimportBlackScholes, BachelierINPUT_DIM=1generator=BlackScholes() # or Bachelier(n = INPUT_DIM) for Bachelier dimension INPUT_DIM
fromtwin_net_tfimporttestastwin_net_tf_testfromutilsimportplot_statsiren=True# set to True if you want to use siren as backbonenTrain=3# number of examples to be generated for trainingnTest=3# number of examples to be generated for the testtrain_seed, test_seed=0, 1batch_size=20with_derivative=TrueHIDDEN_DIM=20N_HIDDEN=2generator_kwargs= {"hidden_units" : HIDDEN_DIM,
"hidden_layers" : N_HIDDEN}
max_epoch=2# maximun number of epochimproving_limit=float("inf") # Stop training if the training loss does not decrease n times (no limit here)ifsiren :
first_omega_0=30.hidden_omega_0=30.outermost_linear=Trueconfig.update({"first_omega_0" : first_omega_0,
"hidden_omega_0": hidden_omega_0,
"outermost_linear" : outermost_linear})
config["activation_function"] =tf.math.sinconfig["deriv_activation_function"] =tf.math.cosdic_loss, regressor, dtrain, dtest, dydxTest, values, deltas, xAxis, vegas=twin_net_tf_test(
generator, [nTrain],
nTrain, nTest,
trainSeed=train_seed, testSeed=test_seed, weightSeed=0,
deltidx=0,
generator_kwargs=generator_kwargs,
epochs=max_epoch,
improving_limit=improving_limit,
min_batch_size=batch_size
)
plot_stat(regressor.stats["normal"], with_derivative=with_derivative)
plot_stat(regressor.stats["differential"], with_derivative=with_derivative)
fromtwin_net_tfimportgraphimportnumpyasnpgraph_name="Black & Scholes"yTest=dtest[1]
# show predicitionsgraph(graph_name, values, xAxis, "", "values", yTest, [nTrain], True)
# show deltasgraph(graph_name, deltas, xAxis, "", "deltas", dydxTest, [nTrain], True)
# show_graph_per_axis foriinrange(INPUT_DIM) :
xAxis=np.array([[x[i]] forxindtest[0]])
# show predicitionsgraph("%s x%d vs y"% (graph_name, (i+1)), values, xAxis, "", "values", yTest, [nTrain], True)
# show deltasgraph("%s x%d vs dxdy"% (graph_name, (i+1)), deltas, xAxis, "", "deltas", dydxTest, [nTrain], True)
Effective calibration prior on the absolute magnitude of Type Ia supernovae
priorMB.nb quickly computes the effective calibration prior on the absolute magnitude M_B of Type Ia supernovae that corresponds to a given determination of H_0.
See Camarena & Marra arXiv:1906.11814 and arXiv:2101.08641 for more details.
Pantheon+ dataset (Scolnic et al 2021) ==>
coming...
see github.com/PantheonPlusSH0ES for the CosmoSIS likelihood which includes the full covariance matrix between supernovae and calibrators.
Statistical analysis
When performing cosmological inference, instead of using the prior on H_0:
,
use the prior on M_B:
.
The prior on the supernova absolute magnitude M_B is to be preferred to the prior on H_0 for the following three reasons:
i) one avoids potential double counting of low-redshift supernovae,
ii) one avoids cosmography, in particular fixing the deceleration parameter to the standard model value of q_0=-0.55 (see arXiv:2112.04510 for details),
iii) one includes in the analysis the fact that M_B is constrained by local calibration, an information which would otherwise be neglected in the analysis.
Monte Python likelihood
The directory montepython_prior contains the M_B likelihood for Monte Python together with a parameter file example. Monte Python v3.5 already includes this likelihood.
Credits
You can use CalPriorSNIa, or part of it, freely, provided that in your publications you acknowledge its use and cite the papers Camarena & Marra arXiv:1906.11814 and arXiv:2101.08641.
If using the provided supernova data, please cite the corresponding paper.
Participants answers (transcripted interviews and quantitative data)
Code to reproduce the figures in our paper
User study design
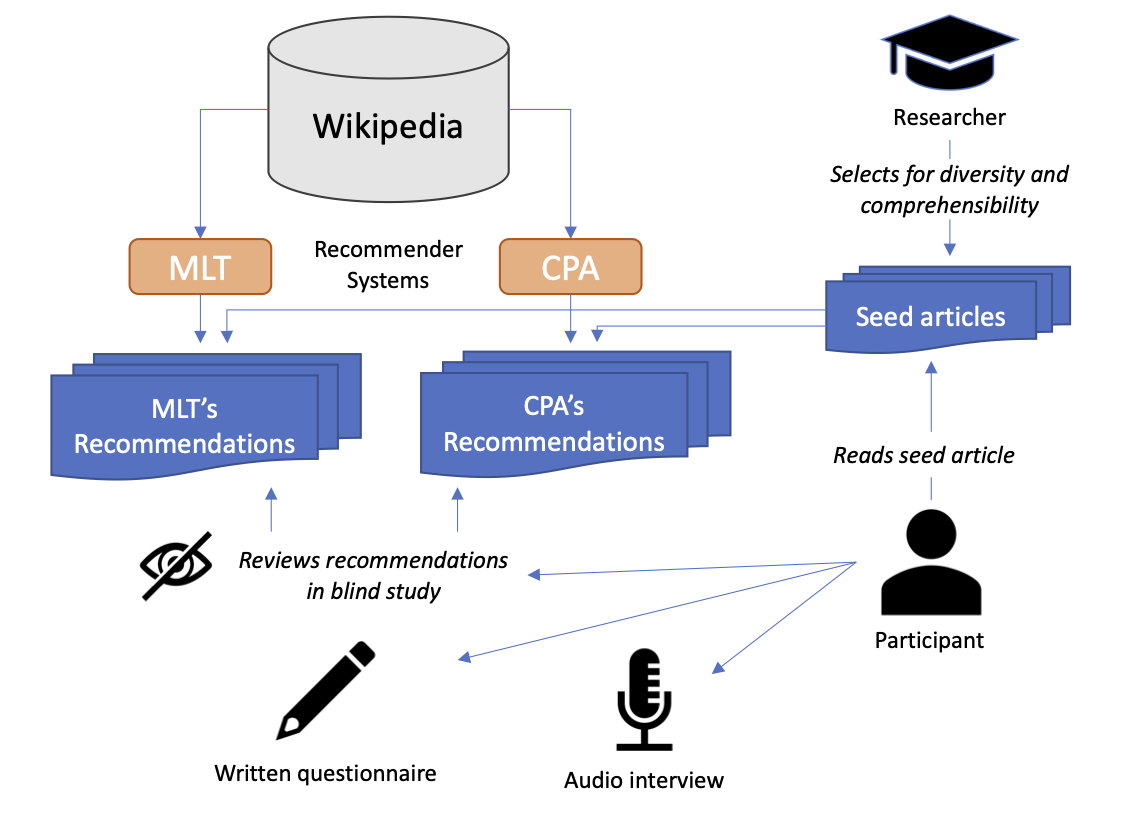
Prior to our study, we created a sample of 40 seed articles covering a diverse spectrum of article types in Wikipedia.
Our aim when selecting these seed articles was to achieve a diversity of topics, which nonetheless remained comprehensible to a general audience.
To fulfil the requirement of comprehensibility, we excluded topics that would require expert knowledge to judge the relevance of recommendations, e.g., articles on mathematical theorems or regional historical events.
Moreover, the seed articles featured diverse article characteristics, such as article length and article quality, which we judged using Wikipedia’s vital article policy.
We distinguished seed articles into four categories.
First, according to their popularity (measured by page views) into either niche or popular articles, and second, according to the content of the article into either generic, i.e. reference articles typical of encyclopedias, or named entities, i.e. politicians, celebrities, or locations.
We choose popularity as a criterion because, on average, popular articles receive more in-links from other articles.
Schwarzer et al. found that the number of in-links affected the performance of the link-based CPA approach.
Moreover, we expected study participants to be more familiar with popular topics compared to niche articles and therefore users will be better able to express their spontaneous information needs when examining a topic.
The “article type” categories were chosen to study the effect that articles about named entities may have on MLT.
Names of entities tend to be more unique than terms in articles on generic topics. Therefore, we expect that specific names may affect MLT’s performance.
Likewise, due to the nature of Wikipedia links to generic topics, they may appear in a broader context than links to named entities.
Thus, CPA’s performance may also be affected.
These considerations resulted in four article categories:
(A) niche generic articles,
(B) popular generic articles,
(C) niche named entities, and
(D) popular named entities.
To perform our qualitative evaluation of user-perceived recommendation effectiveness, we recruited 20 participants.
Participants were students and doctoral researchers from several universities in Berlin and the University of Konstanz.
The average age of participants was 29 years.
65% of our participants said they spend more than an hour per month on Wikipedia, with the average being 4.6 hours spent on Wikipedia.
Our study contained both qualitative and a quantitative data collection components, i.e. mixed methods design. The quantitative component took the form of a written questionnaire.
This questionnaire asked participants about each recommendation set separately and elicited responses on a 5-point Likert scale.
Some questions were tailored to gain insights on the research questions we defined for our study, while the remainder of the questions adhered to the ResQue framework for user-centric evaluation.
The qualitative component took place as an interview.
This component contained open-ended questions that encouraged participants to compare the two recommendation sets.
The participants were asked to describe their perceived satisfaction.
Resulting from this design, we could use the qualitative semi-structured interviews to interpret and validate the results from our quantitative questionnaires.
The qualitative interviews were audio-recorded with the permission of our participants.
In the study, each participant was shown four Wikipedia articles, one at a time.
For each article, two recommendation sets, each containing five recommended articles, were displayed.
One set was generated using CPA, i.e., the link-based Citolytics implementation, while the other was generated using the MLT algorithm.
Each set of four Wikipedia articles was shown to a total of two participants to enable checking for the presence of inter-rater agreement.
Participants were aware that recommendation sets had been generated using different approaches, but they did not know the names of the approaches and the method behind the generation, or on which side below the seed article which recommendation set was being displayed. We alternated the placement to avoid the forming of a potential bias.
The seed Wikipedia articles were shown to participants via a tablet or a laptop.
The participants were asked to read and scroll through the full article so that the exploration of the article’s content was a natural as possible.
Evaluation data
The evaluation data can be found in ./data.
Code
Follow these instructions to reproduce the figures from our paper.
Requirements
Python 3.7+ (Conda)
Installation
Create a new virtual environment for Python 3.7 with Conda:
conda create -n paper python=3.7
conda activate paper
Clone repository and install dependencies:
git clone https://github.com/malteos/wikipedia-article-recommendations.git repo
cd repo
pip install -r requirements.txt
Figures
Start the Jupyter notebook and execute all cells to generate the figures:
@InProceedings{Ostendorff2021b,
  title = {A Qualitative Evaluation of User Preference for Link-based vs. Text-based Recommendations of Wikipedia Articles},
  booktitle = {Proceedings of the 23rd International Conference on Asia-Pacific Digital Libraries (ICADL 2021)},
  author = {Ostendorff, Malte and Breitinger, Corinna and Gipp, Bela},
  year = {2021},
  month = {Dec.},
}
This extension shortcode provides support for adding download buttons in the html files with attached small image/pdf/txt/csv files using shortcode {{< downloadthis >}}.
Install postgreSQL if you don’t have it already and create a database ( there is also a docker compose file if you prefer using docker, just run docker-compose up inside the backend folder)
Create an empty .env file in /backend, copy /backend/.env.example contents into it, and fill in your database username and password.
pnpm install
npm run dev
App should now be running on http://localhost:5137/
Inspiration and Why? 🤷♀️
I’m a Full Stack Web developer and an open source collaborator that loves building things 😉
This project is basically a clone of another open source Jira clone build in React ( clone of a clone i know 😵) and since im a Vuejs lover i had the idea of rebuilding the app with the same functionalities but using Vuejs instead as i though it would be a great opportunity to explore the new composition api coming to Vue very soon. and since we are doing a full rewrite i added Graphql and Typescript to the mix.
I believe that this project will be a great example for Vuejs developers in the future transitioning from the old Vuejs Api to the new composition Api or for Vuejs newcomers in general.
I think the state of the project is good as it is right now feature wise and i will only be fixing bugs if they come up so it you want to contribute in doing so you are very welcome.
Sym-Osp is a state-of-the-art optimal oversubscription planner based on symbolic search and extends Fast Downward.
Main source:
Speck, D.; Michael Katz. 2021. Symbolic Search for Oversubscription Planning. In Proceedings of the Thirty-Fifth AAAI Conference on Artificial Intelligence (AAAI 2021), AAAI Press. (to appear)
@InProceedings{speck-katz-aaai2021, author = "David Speck and Michael Katz", title = "Symbolic Search for Oversubscription Planning", booktitle = "Proceedings of the Thirty-Fifth {AAAI} Conference on Artificial Intelligence ({AAAI} 2021)", publisher = "{AAAI} Press", year = "2021", pages = "11972--11980"}
Dependencies
Currently we only support Linux systems. The following should install all necessary dependencies.
A complete API key system to create & revoke user keys 🔑
Additionally, the application boasts a visually appealing UI, thanks to the use of Radix UI Primitives,
Tailwind CSS, fonts from next/font, and icons from Lucide. The dark mode,
powered by next-themes, enhances the user experience further.
💡 Inspiration
The inspiration behind this project, API Hub, came from the need for a centralized interface that allows users to obtain API keys easily and perform various tasks with different input formats. We wanted to create a platform that provides historical data tracking, triggers, and API invocation counts, empowering users to generate unique results and gain valuable context for their API usage.
📌 About the Product
API Hub is a feature-rich web application built using Next.js, TypeScript, Prisma, and Planetscale. It serves as a centralized portal for managing API keys and provides several essential functionalities to enhance the API usage experience.
🤔 What it does do?
API Hub offers the following key features:
Rate Limited API routes to control the number of requests made to the API.
Protection of sensitive routes to secure critical endpoints from unauthorized access.
Google Authentication for users to log in securely using their Google accounts.
Typescript for type safety and enhanced code maintainability.
A complete API key system to create and revoke user keys for accessing different APIs.
The project also leverages Radix UI Primitives, Tailwind CSS, fonts from next/font, and icons from Lucide to ensure a visually appealing and user-friendly interface. It offers a beautiful dark mode powered by next-themes for added convenience.
Additionally, various tailwindcss plugins like tailwind-merge, tailwindcss-animate, clsx for conditional classes, and class-variance-authority for handling variants are utilized to streamline the UI development process.
⚒️ How we built it?
Frontend
The front end of API Hub is developed using Next.js, a powerful React framework known for its server-side rendering capabilities and excellent developer experience. TypeScript is employed to catch type-related errors early and improve code maintainability.
Backend
For the backend, we utilized Prisma, an efficient and type-safe ORM (Object-Relational Mapping) tool. Prisma simplifies database interactions and ensures data consistency and security.
Security
Security is a top priority for API Hub. We have implemented rate limiting on API routes to prevent abuse and protect the server from excessive requests. Sensitive routes are safeguarded to ensure that only authorized users can access critical endpoints. Google Authentication is implemented to provide a secure and seamless login experience.
📚 What we learned
Throughout the development of API Hub, our team gained valuable insights into building complex web applications. We deepened our understanding of Next.js, TypeScript, Prisma, and Planetscale while integrating various UI libraries and tailwindcss plugins to create an aesthetically pleasing and functional interface.
Revenue Streams 💰
The project provides opportunities for potential revenue streams, such as offering premium features or subscription plans for advanced API usage or enhanced support.
Getting Started
To get a local copy up and running follow these simple steps.
Prerequisites
In order to get a copy of the project you will require you to have Node.js (v14+) and the NPM package manager installed. If you don’t have it, you can download the latest version of Node.js from the official website which also installs the NPM package manager by default.
📥 Clone the repository:
Open the terminal in the folder in which you wish to clone the repository and enter the following command:
git clone https://github.com/pranjal6314/text-number-api.git
cd text-number-api
📦 Install dependencies:
npm i
⚙️In order to run :
npm run dev
🌐 Open your browser and go to http://localhost:3000 to access LearnUP.
Get Involved 👥
We welcome contributions from developers and designers Here’s how you can get involved:
👩💻 Developers: If you’re a developer, you can contribute to the growth and enhancement of API Hub W. Whether it’s fixing bugs, adding new features, or optimizing performance, your skills are valuable to us. Check out our Contributor’s Guide for details.
🎨 Designers: You can help improve the visual aspects of the website, ensuring it is intuitive and visually appealing.
Feedback 💬
Your feedback is valuable to us! If you encounter any issues or have suggestions for improvement, please submit an issue.
In this article, we will look at a bug in the DAO code. The hacker exploited a bug in the code of the DAO and stole more or less $50 million worth of ether. I will focus here only on the main technical issue of the exploit: The fallback function. For a more detailed and advanced recount of the attack, the blog posts by Phil Daian and Peter Vessenes are highly recommended.
This post will be the first in what is potentially a series, deconstructing and explaining what went wrong at the technical level while providing a timeline tracing the actions of the attacker back through the blockchain. This first post will focus on how exactly the attacker stole all the money in the DAO.
A Multi-Stage Attack
This exploit in the DAO is clearly not trivial; the exact programming pattern that made the DAO vulnerable was not only known, but fixed by the DAO creators themselves in an earlier intended update to the framework’s code. Ironically, as they were writing their blog posts and claiming victory, the hacker was preparing and deploying an exploit that targeted the same function they had just fixed to drain the DAO of all its funds.
Let’s get into the overview of the attack. The attacker was analyzing DAO.sol, and noticed that the ‘splitDAO’ function was vulnerable to the recursive send pattern we’ve described above: this function updates user balances and totals at the end, so if we can get any of the function calls before this happens to call splitDAO again, we get the infinite recursion that can be used to move as many funds as we want (code comments are marked with XXXXX, you may have to scroll to see em):
function splitDAO(
  uint _proposalID,
  address _newCurator
) noEther onlyTokenholders returns (bool _success) {

  ...
  // XXXXX Move ether and assign new Tokens.  Notice how this is done first!
  uint fundsToBeMoved =
      (balances[msg.sender] * p.splitData[0].splitBalance) /
      p.splitData[0].totalSupply;
  if (p.splitData[0].newDAO.createTokenProxy.value(fundsToBeMoved)(msg.sender) == false) // XXXXX This is the line the attacker wants to run more than once
      throw;

  ...
  // Burn DAO Tokens
  Transfer(msg.sender, 0, balances[msg.sender]);
  withdrawRewardFor(msg.sender); // be nice, and get his rewards
  // XXXXX Notice the preceding line is critically before the next few
  totalSupply -= balances[msg.sender]; // XXXXX AND THIS IS DONE LAST
  balances[msg.sender] = 0; // XXXXX AND THIS IS DONE LAST TOO
  paidOut[msg.sender] = 0;
  return true;
}
The basic idea is this: propose a split. Execute the split. When the DAO goes to withdraw your reward, call the function to execute a split before that withdrawal finishes. The function will start running without updating your balance, and the line we marked above as “the attacker wants to run more than once” will run more than once. What does that do? Well, the source code is in TokenCreation.sol, and it transfers tokens from the parent DAO to the child DAO. Basically the attacker is using this to transfer more tokens than they should be able to into their child DAO.
How does the DAO decide how many tokens to move? Using the balances array of course:
Because p.splitData[0] is going to be the same every time the attacker calls this function (it’s a property of the proposal p, not the general state of the DAO), and because the attacker can call this function from withdrawRewardFor before the balances array is updated, the attacker can get this code to run arbitrarily many times using the described attack, with fundsToBeMoved coming out to the same value each time.
The first thing the attacker needed to do to pave the way for his successful exploit was to have the withdraw function for the DAO, which was vulnerable to the critical recursive send exploit, actually run. Let’s look at what’s required to make that happen in code (from DAO.sol):
If the hacker could get the first if statement to evaluate to false, the statement marked vulnerable would run. When that statements runs, code that looks like this would be called:
Notice how the marked line is exactly the vulnerable code mentioned in the description of the exploit we linked!
That line would then send a message from the DAO’s contract to “_recipient” (the attacker). “_recipient” would of course contain a default function, that would call splitDAO again with the same parameters as the initial call from the attacker. Remember that because this is all happening from inside withdrawFor from inside splitDAO, the code updating the balances in splitDAO hasn’t run. So the split will send more tokens to the child DAO, and then ask for the reward to be withdrawn again. Which will try to send tokens to “_recipient” again, which would again call split DAO before updating the balances array.
And so it goes:
Propose a split and wait until the voting period expires. (DAO.sol, createProposal)
Execute the split. (DAO.sol, splitDAO)
Let the DAO send your new DAO its share of tokens. (splitDAO -> TokenCreation.sol, createTokenProxy)
Make sure the DAO tries to send you a reward before it updates your balance but after doing (3). (splitDAO -> withdrawRewardFor -> ManagedAccount.sol, payOut)
While the DAO is doing (4), have it run splitDAO again with the same parameters as in (2) (payOut -> _recipient.call.value -> _recipient())
The DAO will now send you more child tokens, and go to withdraw your reward before updating your balance. (DAO.sol, splitDAO)
Back to (5)!
Let the DAO update your balance. Because (7) goes back to (5), it never actually will :-).
(Side note: Ethereum’s gas mechanics don’t save us here. call.value passes on all the gas a transaction is working with by default, unlike the send function. so the code will run as long as the attacker will pay for it, which considering it’s a cheap exploit means indefinitely)
Armed with this, we can provide a step by step re-trace of how The DAO got emptied out.
Step 1: Proposing the Split
The first step towards all of the above is to simply propose a regular split, as we’ve mentioned.
The attacker does this in the blockchain here in DAO Proposal #59, with the title “Lonely, so Lonely”.
Because of this line:
// The minimum debate period that a split proposal can have
uint constant minSplitDebatePeriod = 1 weeks;
he had to wait a week for the proposal to see approval. No matter, it’s just a split proposal like any other! Nobody will look too closely at it, right?
Step 2: Getting the Reward
As was neatly explained in one of slock.it’s previous posts on the matter, there are no rewards for the DAO to give out yet! (because no rewards were generated).
As we mentioned in the overview, the critical lines that need to run here are:
If the hacker could get the first marked line to run, the second marked line will run the default function of his choosing (that calls back to splitDAO as we described previously).
Let’s deconstruct the first if statement:
if ((balanceOf(_account) * rewardAccount.accumulatedInput()) / totalSupply < paidOut[_account])
The balanceOf function is defined in Token.sol, and of course does exactly this:
return balances[_owner];
The rewardAccount.accumulatedInput() line is evaluated from code in ManagedAccount.sol:
// The sum of ether (in wei) which has been sent to this contract
uint public accumulatedInput;
Luckily accumulatedInput is oh so simple to manipulate. Just use the default function of the reward account!
function() {
    accumulatedInput += msg.value;
}
Not only that, but because there is no logic to decrease accumulatedInput anywhere (it tracks the input the account has gotten from all the transactions ever), all the attacker needs to do is send a few Wei to the reward account and our original condition will not only evaluate to false, but its constituent values will evaluate to the same thing every time it’s called:
if ((balanceOf(_account) * rewardAccount.accumulatedInput()) / totalSupply < paidOut[_account])
Remember that because balanceOf refers to balances, which never gets updated, and because paidOut and totalSupply also never get updated since that code in splitDAO never actually executes, the attacker gets to claim their tiny share of the reward with no problems. And because they can claim their share of the reward, they can run their default function and reenter back to splitDAO. Whoopsie.
But do they actually need to include a reward? Let’s look at the line again:
if ((balanceOf(_account) * rewardAccount.accumulatedInput()) / totalSupply < paidOut[_account])
What if the reward account balance is 0? Then we get
if (0 < paidOut[_account])
If nothing has ever been paid out, this will always evaluate to false and never throw! Why? The original line is equivalent, after subtracting paidOut from both sides, to:
if ((balanceOf(_account) * rewardAccount.accumulatedInput()) / totalSupply - paidOut[_account] < 0)
where that first part is actually how much is being paid out. So the check is actually:
if (amountToBePaid < 0)
But if amountToBePaid is 0, the DAO pays you anyway. To me this doesn’t make much sense — why waste the gas in this manner? I think this is why many people assumed the attacker needed a balance in the reward account to proceed with the attack, something they in fact did not require. The attack works the same way with an empty reward account as with a full one!
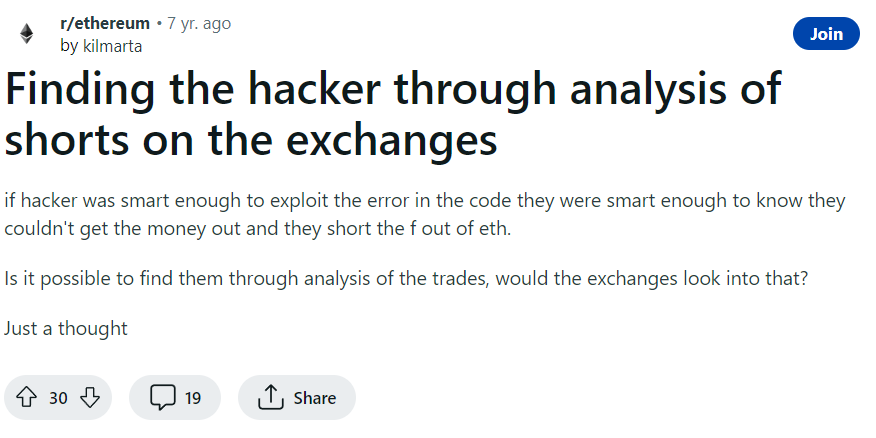
A number of entirely unsubstantiated allegations on social media have pointed to a $3M Ethereum short that occurred on Bitfinex just moments before the attack, claiming this short closed with almost $1M USD of profit.
It’s obvious to anyone constructing or analyzing this attack that certain properties of the DAO (specifically that any split must be running the same code as the original DAO) require an attacker to wait through the creation period of their child DAO (27 days) before withdrawing any coins in a malicious split. This gives the community time to respond to a theft, through either a soft fork freezing attacker funds or a hard fork rolling back the compromise entirely.
Any financially motivated attacker who had attempted their exploit on the testnet would have an incentive to ensure profits regardless of a potential rollback or fork by shorting the underlying token. The staggering drop that resulted within minutes of the smart contract that triggered the malicious split provided an excellent profit opportunity, and while there is no proof the attacker took the profit opportunity, we can at least conclude that after all this effort they would have been stupid not to.
Step 3a: Preventing Exit (Resistance is Futile)
Another contingency that the attacker needed to think of is the case that a DAO split occurs before the attacker can finish emptying the DAO. In this case, with another user as sole curator, the attacker would have no access to DAO funds.
Unfortunately the attacker is a smart guy: there is evidence that the attacker has voted yes on all split proposals that come to term after his own, making sure that he would hold some tokens in the case of any DAO split. Because of a property of the DAO we’ll discuss later in the post, these split DAOs are vulnerable to the same emptying attack we’re describing here. All the attacker has to do is sit through the creation period, send some Ether to the reward account, and propose and execute a split by himself away from this new DAO. If he can execute before the curator of this new DAO updates the code to remove the vulnerability, he manages to squash all attempts to get Ether out of the DAO that aren’t his own.
Notice by the timestamps here that the attacker did this right around the time he started the malicious split, almost as an afterthought. I see this more as an unnecessary middle finger to the DAO than a financially viable attack: having already emptied virtually the entire DAO, going through this effort to pick up any pennies that might be left on the table is probably an attempt to demoralize holders into inaction. Many have concluded, and I agree, that this hints at the attacker’s motivations being a complete destruction of the DAO that goes beyond profit taking. While none of us know the truth here, I do recommend applying your own judgment.
Interestingly enough, this attack was described by Emin Gün Sirer after it had already occurred on the blockchain, but before the public had noticed.
Step 4: Executing the Split
So we’ve painstakingly described all the boring technical aspects of this attack. Let’s get to the fun part, the action: executing the malicious split. The account that executed the transactions behind the split is 0xf35e2cc8e6523d683ed44870f5b7cc785051a77d.
Deconstructing the constructor arguments that created that child DAO leads us to a curator at 0xda4a4626d3e16e094de3225a751aab7128e96526. That smart contract is just a regular multisignature wallet, with most of its past transactions being adding/removing owners and other wallet management tasks. Nothing interesting there.
Johannes Pfeffer on Medium has an excellent blockchain-based reconstruction of the transactions involved in the malicious Child DAO. I won’t spend too much time on such blockchain analysis, since he’s already done a great job. I highly encourage anyone interested to start with that article.
In the next article in the series, we’ll look at the code from the malicious contract itself (containing the exploit that actually launched the recursive attack). In the interest of expedience of release, we have not yet completed such an analysis.
Step 4a: Extending the Split
This step is an update to the original update, and covers how the attacker was able to turn a ~30X amplification attack (due to the max size of Ethereum’s stack being capped at 128) to a virtually infinite draining account.
Savvy readers of the above may notice that, even after overwhelming the stack and executing many more malicious splits than was required, the hacker would have their balance zeroed out by the code at the end of splitDAO:
function splitDAO(
  ....
  withdrawRewardFor(msg.sender); // be nice, and get his rewards
  totalSupply -= balances[msg.sender];
  balances[msg.sender] = 0;
  paidOut[msg.sender] = 0;
  return true;
}
So how did the attacker get around this? Thanks to the ability to transfer DAO tokens, he didn’t really need to! All he had to do was call the DAO’s helpful transfer function at the top of his stack, from his malicious function:
By transferring the tokens to a proxy account, the original account would be zeroed out correctly at the end of splitDAO (notice how if A transfers all its money to B, A’s account is already zeroed out by transfer before it can be zeroed out by splitDAO). The attacker can then send the money back from the proxy account to the original account and start the whole process again. Even the update to totalSupply in splitDAO is missed, since p.totalSupply[0] is used to calculate the payout, which is a property of the original proposal and only instantiated once before the attack occurs. So the attack size stays constant despite less available ETH in the DAO with every iteration.
The evidence of two malicious contracts calling into withdrawRewardFor on the blockchain suggests that the attacker’s proxy account was also an attack-enabled contract that simply alternated as the attacker with the original contract. This optimization saves the attacker one transaction per attack cycle, but otherwise appears unnecessary.
Was 1.1 Vulnerable?
Because this vulnerability was in withdrawRewardFor, a natural question to ask is whether the DAO 1.1, with the updated function, was still vulnerable to a similar attack. The answer: yes.
Check out the updated function (especially the marked lines):
Notice how paidOut is updated before the actual payout is made now. So how does this affect our exploit? Well, the second time getRewardFor is called, from inside the evil second call to splitDAO, this line:
will come out to 0. The payOut call will then call _recipient.call.value(0)(), which is the default value for that function, making it equivalent to a call to
_recipient.call()
Because the attacker paid for a lot of gas when sending his malicious split transaction, the recursive attack is allowed to continue with a vengeance.
Realizing they needed a 1.2 6 days after a 1.1, on code designed to be secure for years, is probably why the DAO’s puppet masters called it quits.
An Important Takeaway
I think the susceptibility of 1.1 to this attack is really interesting: even though withdrawReward for was not vulnerable by itself, and even though splitDAO was not vulnerable without withdrawRewardFor, the combination proves deadly. This is probably why this exploit was missed in review so many times by so many different people: reviewers tend to review functions one at a time, and assume that calls to secure subroutines will operate securely and as intended.
In the case of Ethereum, even secure functions that involve sending funds could render your original function as vulnerable to reentrancy. Whether they’re functions from the default Solidity libraries or functions that you wrote yourself with security in mind. Special care is required in reviews of Ethereum code to make sure that any functions moving value occur after any state updates whatsoever, otherwise these state values will be necessarily vulnerable to reentrancy.
I won’t cover the fork debate or what’s next for Ethereum and The DAO here. That subject is being beaten to death on every form of social media imaginable.
For our series of posts, the next step is to reconstruct the exploit on the TestNet using the DAO 1.0 code, and demonstrate both the code behind the exploit and the mechanism of attack. Please note that if someone beats me to these objectives, I reserve the right to cap the length of the series at one.
Solidity
Solidity is an object-oriented, high-level language for implementing smart contracts. Smart contracts are programs that govern the behavior of accounts within the Ethereum state.
Solidity is a curly-bracket language designed to target the Ethereum Virtual Machine (EVM). It is influenced by C++, Python, and JavaScript. You can find more details about which languages Solidity has been inspired by in the :doc:`language influences <language-influences>` section.
Solidity is statically typed, supports inheritance, libraries, and complex user-defined types, among other features.
With Solidity, you can create contracts for uses such as voting, crowdfunding, blind auctions, and multi-signature wallets.
When deploying contracts, you should use the latest released version of Solidity. Apart from exceptional cases, only the latest version receives security fixes. Furthermore, breaking changes, as well as new features, are introduced regularly. We currently use a 0.y.z version number to indicate this fast pace of change.
You can download this documentation as PDF, HTML or Epub by clicking on the versions flyout menu in the bottom-left corner and selecting the preferred download format.
Getting Started
1. Understand the Smart Contract Basics
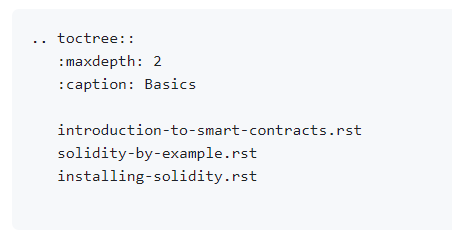
If you are new to the concept of smart contracts, we recommend you to get started by digging into the “Introduction to Smart Contracts” section, which covers the following:
Once you are accustomed to the basics, we recommend you read the :doc:`”Solidity by Example” <solidity-by-example>` and “Language Description” sections to understand the core concepts of the language.
You can try out code examples directly in your browser with the Remix IDE. Remix is a web browser-based IDE that allows you to write, deploy and administer Solidity smart contracts, without the need to install Solidity locally.
Warning
As humans write software, it can have bugs. Therefore, you should follow established software development best practices when writing your smart contracts. This includes code review, testing, audits, and correctness proofs. Smart contract users are sometimes more confident with code than their authors, and blockchains and smart contracts have their own unique issues to watch out for, so before working on production code, make sure you read the :ref:`security_considerations` section.
4. Learn More
If you want to learn more about building decentralized applications on Ethereum, the Ethereum Developer Resources can help you with further general documentation around Ethereum, and a wide selection of tutorials, tools, and development frameworks.
Community contributors help translate this documentation into several languages. Note that they have varying degrees of completeness and up-to-dateness. The English version stands as a reference.
You can switch between languages by clicking on the flyout menu in the bottom-left corner and selecting the preferred language.
We set up a GitHub organization and translation workflow to help streamline the community efforts. Please refer to the translation guide in the solidity-docs org for information on how to start a new language or contribute to the community translations.
Contents
Basic concepts
To start off, keep in mind that in Ethereum there are two types of accounts: (i) externally owned accounts controlled by humans and (ii) contract accounts controlled by code. This is important because only contract accounts have associated code, and hence, can have a fallback function.
In Ethereum all the action is triggered by transactions or messages (calls) set off by externally owned accounts. Those transactions can be an ether transfer or the triggering of contract code. Remember, contracts can trigger other contracts’ code as well.
Smart contracts are written in high-level programming languages such as Solidity but for those contracts to be uploaded on the blockchain, they need to be compiled into bytecode, a low-level programming language executed by the Ethereum Virtual Machine (EVM). Said bytecode can be interpreted with opcodes.
When a contract calls or sends money to another contract that code compiles in the EVM bytecode, invoking the call function. But, there is a difference: When calling another contract the call function provides specific function identifiers and data, however, when sending money to another contract, the call function has a set amount of gas but no data (case b below), and thus, triggers the fallback function of the called contract.
The attack
The fallback function abuse played a very important role in the DAO attack. Let’s see what a fallback function is and how it can be used for malicious purposes.
Fallback function
A contract can have one anonymous function, known as well as the fallback function. This function does not take any arguments and it is triggered in three cases [1]:
a. If none of the functions of the call to the contract match any of the functions in the called contract
b. When the contract receives ether without extra data
c. If no data was supplied
Example
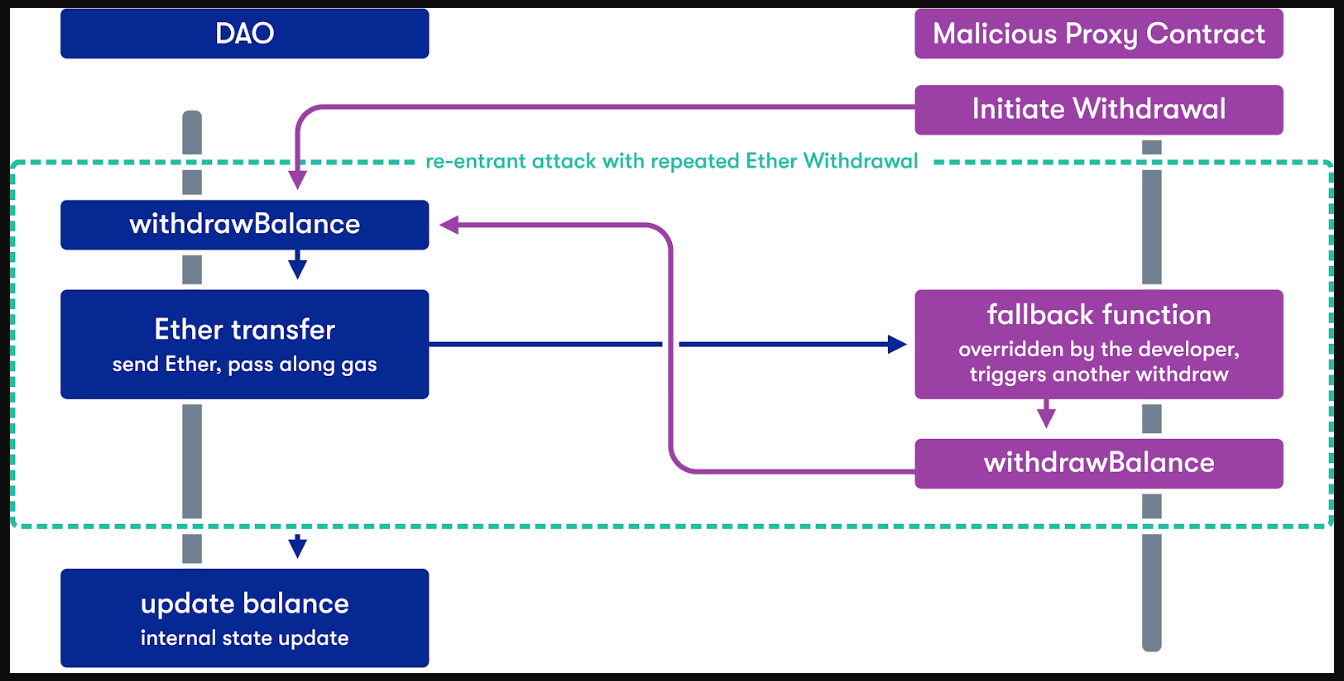
The following is sample code for a contract vulnerable to a malicious fallback function of another contract. In this example we have two contracts: (i) the contract Bank (vulnerable contract) and (ii) the contract BankAttacker (malicious contract). Imagine that the contract Bank is the DAO smart contract but much more simplified and the contract BankAttacker is the hacker’s malicious smart contract that emptied the DAO.
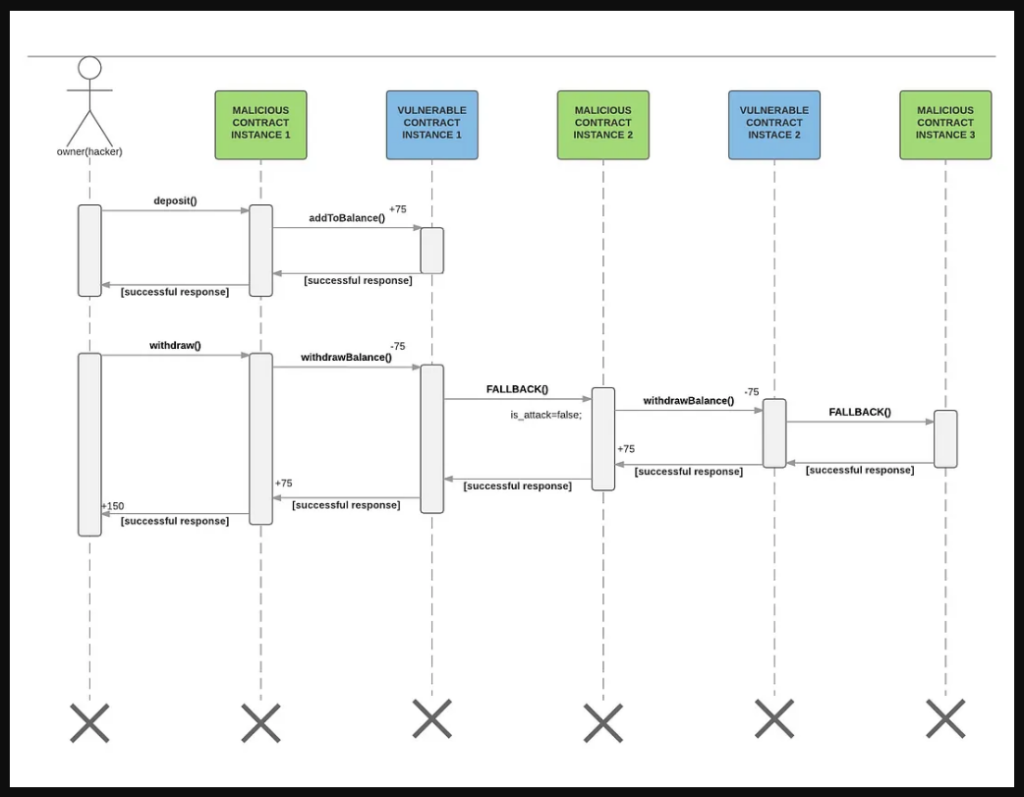
The hacker initiates the interaction with contract Bank through its malicious contract and the sequence of the actions is as follows:
The first thing the hacker does is send ether (75 wei) to the vulnerable contract through the depositfunction of the malicious contract. This function calls the addToBalance function of the vulnerable contract.
Then, the hacker withdraws, through the withdraw function of the malicious contract, the same amount of wei (75), triggering the withdrawBalancefunction of the vulnerable contract.
The withdrawBalance function first sends ether (75 wei) to the malicious contract, triggering its fallback function, and last updates the userBalances variable(that this piece is done last is very important for the attack).
The malicious fallback function calls the withdrawBalancefunction again (recursive call), doubling the withdraw, before the execution of the first withdrawBalance function finishes, and thus, without updating the userBalances variable.
In this example, there are only two recursive calls to the withdrawBalance function so the hacker ends up with a balance of 150 wei. They took more than they should (75 wei) because the userBalance variable is the last thing set/updated.
One important point is that unlike the JavaScript’s blocks of code, the EVM executes instructions synchronously, one after the other, and this is why the userBalance variable is updated only after the previous code is finished.
The following is a more graphic explanation of the example. The instances referred in this graphic are the different states of the contracts saved in the blockchain. In the graphic you will see that the hacker, through his/her/their external account, triggers the malicious contract, so this contract can interact with the vulnerable contract.
Last, here is the example in JavaScript, just in case you are not very familiar with Solidity yet.
The hacker stole over $100 million in crypto from the Mango Markets Exchange on Tuesday, and may get to keep almost half of it.
Mango DAO has offered a deal to the thief who made off with $100 million in crypto from an exploit in the Mango Markets platform earlier this week—a way to avoid a criminal investigation and pay off bad debt.
The Mango DAO, a decentralized autonomous organization that manages Mango Markets, has offered the hacker a bug bounty of $47 million, meaning that the thief would be required to send back $67 million worth of tokens under the terms of the deal.
“We are seeking to make users whole to the extent possible,” the Mango DAO proposal says, addressing the thief.
On Tuesday, a hacker was able to steal over $100 million through an exploit in the Mango Markets Solana DeFi exchange. The attacker temporarily drove up the value of their collateral and then took out loans from the Mango treasury.
The DAO is a so-called Decentralized Autonomous Organization (“DAO”). DAOs run through rules encoded as smart contracts, which in turn are computer programs that facilitate, verify, or enforce the negotiation or performance of a contract, or that make a contractual clause unnecessary. In simple terms, think of any contract between two parties that gets translated into code, so it doesn’t need any external action but does automatically what was agreed. Smart Contracts are a pretty revolutionary and powerful concept by itself and if you want to know more about it, read our separate post on the subject.
The idea of a DAO somewhat is that once launched it can run based on its underlying smart contracts alone. The DAO’s smart contracts are based on Etherum, a public blockchain (which is a distributed database – for more information on blockchain, see here) platform with programmable transaction functionality that is also the basis for ether (or ETH), a cryptocurrency. ETH is a cryptocurrency similar to Bitcoin, but very popular since it offers a wider range of services and therefore sometimes considered a considerable challenger of Bitcoin as the leading cryptocurrency.
The DAO is fuelled using ether, which creates DAO tokens. DAO token holders will have the right to vote on investment proposals (proportional to the number of tokens held) as well as the opportunity to receive rewards generated by the output of the work from the contractors’ proposals. Since it is decentralized autonomous organization that is represented only by its smart contracts, it has no physical address and people only interact as contractors or curators, but not in managerial roles in the traditional sense. However, it is supported by a limited company and a cryptocurrency exchange in Switzerland, both chosen with a view to the legal and regulatory framework. The DAO is intended as a form of venture capital vehicle that would invest in projects in the sharing economy. Prior to the attack, the fund’s value was around $150 million in ether.
So while its creators hoped to build a more democratic financial institution that would be safe against the fallibility of humans by trusting the trustless concept of the blockchain and smart contracts, it seems human error is at the bottom of the heist.
Though it is not entirely certain yet how the money has been stolen, it appears that the hacker exploited a programing mistake in the code of the DAO. Weaknesses in the code had already been highlighted before and experts in the field had already called to fix critical problems. At this point it is important to recall that as a blockchain-enabled organization, the DAO is completely transparent and everything is done by the code, which anyone can see and audit. So, it seems that what happened – in a very simplified way – was that the hacker sent repeated transaction request to transfer funds to a DAO clone. Because of the programming error, the system possibly did not immediately update the balance, allowing the attacker to drain the account.
Since then the discussion has been how to respond to the attack. In an initial response, Vitalik Buterin, one of Ethereum’s founders, publicly asked online currency exchanges to suspend trading of ether and DAO tokens as well as deposits and withdrawals of the cryptocurrency.
Because of a restriction in the code pay-outs are delayed for at least one week, possibly even longer, the hacker will not be able to access the funds and give The DAO community some time. Several options are currently discussed: The community could decide to do nothing, preserve the system and let the DAO token holders loose their investment. Or the so-called “hard-fork” where the Ethereum community could decide to roll back all transactions to a specific point in time before the attack. Or the network could be updated to ensure that all transactions from the hacker’s ether address are blocked, basically freezing the account and trying to exploit a similar programing error to “steel” the money back since the DAO clone is likely to contain the same code structure that made the original attack possible.
Regardless which course is decided on, what are the likely consequences for the DAO, Ethereum and the Blockchain in general after this incident? Stephen Tual, COO of Slock.it, the company that had worked on the development of The DAO, stated that The DAO is definitely going to close. Whether that is the case is to be seen as in a leaderless organization no one person alone can decide on the fate of the organisation. The future of the investment vehicle is cast into serious doubt in any case by the theft itself, as it is questionable whether anyone would put money in a construction that has a proven vulnerability even when its makers promise to fix the issues. Trust, after all, is relevant even for a trustless concept when it comes to money.
The more damaging aspect for the DAO, but also for Ethereum and potentially even the blockchain technology lies potentially in the actions to get the ether back. In comments across the web it has been compared with a bailout for banks that are too big to fail and that investors simply didn’t understand the risks of their investments. If the system is supposed to be flawless and save against tempering, isn’t meddling with it because of an, albeit very significant and expensive, programming error, undermining the whole idea? If people decide on whether transactions are to be reversed or not instead of the underlying smart contract, what is the worth of such an instrument if it’s only useful if anything goes according to plan?
Regardless what happens next it is an immensely important case as well from a legal and regulatory perspective: One tweet even hinted that a short bet on Ether was placed on one cryptocurrencies exchange shortly before the attack, which reminds us that traditional regulatory aspects like Market Abuse are more than relevant in the digital age. The tweet demanded an investigation though that raises the interesting questions about jurisdiction, governing legal frameworks and regulation, but that is only a side aspect to the story for now (though it would make sense from an economical perspective since the thief is unlikely to be able to access the Ether he stole and in that way could gain a monetary benefit from the heist).
In an interesting post at Coindesk, a US lawyer discussed the incident from a perspective of criminal law (Theft? Yes!), civil law (sue the hacker? Sure, seems everything can be sued) and tort law.
And even more interesting is the question whether the hacker only exploited a loophole in the code. In a message to the DAO and the Ethereum community, which is allegedly from the person responsible for the attack, the hacker described his action simply as using an intentional feature of the code and stated that any action to get the funds back, would amount to seizure of my legitimate and rightful ether, claimed legally through the terms of a smart contract, threatening trying to do so with legal action.
Everything is in flux: at the time of writing this, the DAO community is voting on whether to take action and, if so, in what form. Someone claiming to be an intermediary on behalf of the attackers has published a note, making it look like their holding the stolen ether ransom, and tweets on the subject get seemingly posted every second.
So to summarise, plenty of open questions, an uncertain future for the DAO, but maybe there is a silver lining that comes from this. Maybe this is only a costly episode on a steep learning curve, similar to other forms of innovation, and maybe this will lead to more care, diligence and scrutiny in future blockchain projects, which in the end might not be so bad after all.
I’ve learned a lot understanding the DAO exploit, mainly that programming smart contracts is not an easy task and it should be done rigorously. I still have lots of unsolved questions such as: Do we need fallback functions at all? Apparently this was fixed in the new version of Solidity. However, the problem is still present at the EVM level because a hacker can program in opcode and avoid the Solidity’s security
This package enables use of FEniCS or Firedrake for solving differentiable variational problems in JAX.
Automatic tangent linear and adjoint solvers for FEniCS/Firedrake programs are derived with dolfin-adjoint/pyadjoint.
These solvers make it possible to use JAX’s forward and reverse Automatic Differentiation with FEniCS/Firedrake.
For using JAX-FEniCS without dolfin-adjoint (still differentiable with automatic tangent and adjoint solvers using UFL) check out jax-fenics.
Current limitations:
Composition of forward and reverse modes for higher-order derivatives is not implemented yet.
Differentiation with respect to mesh coordinates is not implemented yet.
Example
Here is the demonstration of solving the Poisson’s PDE
on 2D square domain and calculating the solution Jacobian matrix (du/df) using the reverse (adjoint) mode Automatic Differentiation.
importjaximportjax.numpyasnpfromjax.configimportconfigconfig.update("jax_enable_x64", True)
importfenicsimportfenics_adjointimportuflfromjaxfenics_adjointimportbuild_jax_fem_evalfromfecrimportfrom_numpy# Create mesh for the unit square domainn=10mesh=fenics_adjoint.UnitSquareMesh(n, n)
# Define discrete function spaces and functionsV=fenics.FunctionSpace(mesh, "CG", 1)
W=fenics.FunctionSpace(mesh, "DG", 0)
# Define FEniCS template representation of JAX inputtemplates= (fenics_adjoint.Function(W),)
@build_jax_fem_eval(templates)deffenics_solve(f):
# This function inside should be traceable by fenics_adjointu=fenics_adjoint.Function(V, name="PDE Solution")
v=fenics.TestFunction(V)
inner, grad, dx=ufl.inner, ufl.grad, ufl.dxF= (inner(grad(u), grad(v)) -f*v) *dxbcs= [fenics_adjoint.DirichletBC(V, 0.0, "on_boundary")]
fenics_adjoint.solve(F==0, u, bcs)
returnu# build_jax_fem_eval is a wrapper decorator that registers `fenics_solve` for JAX# Let's create a vector of ones with size equal to the number of cells in the meshf=np.ones(W.dim())
u=fenics_solve(f) # u is JAX's arrayu_fenics=from_numpy(u, fenics.Function(V)) # we need to explicitly provide template function for conversion# now we can calculate vector-Jacobian product with `jax.vjp`jvp_result=jax.vjp(fenics_solve, f)[1](np.ones_like(u))
# or the full (dense) Jacobian matrix du/df with `jax.jacrev`dudf=jax.jacrev(fenics_solve)(f)
# function `fenics_solve` maps R^200 (dimension of W) to R^121 (dimension of V)# therefore the Jacobian matrix dimension is dim V x dim Wassertdudf.shape== (V.dim(), W.dim())
Check examples/ or tests/ folders for the additional examples.