Main Goal. An attempt to adapt MS Graph UWP Sample via “UWP down-shifting”, for all my devices
(PC / XBox , and… old sweet Microsoft Lumia 950!)
Super goal: reconstruct Microsoft TODO API logics… as part of Microsoft Graph.
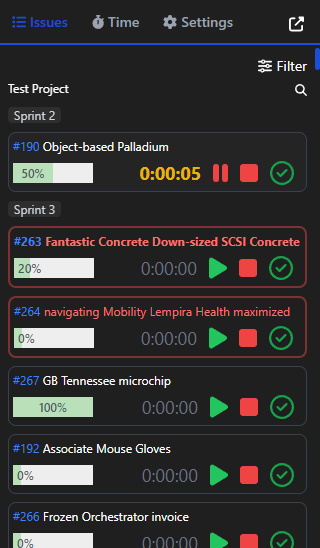
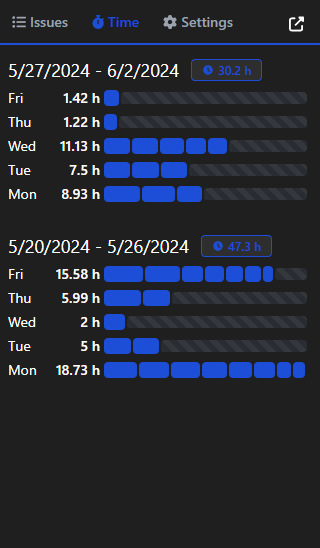
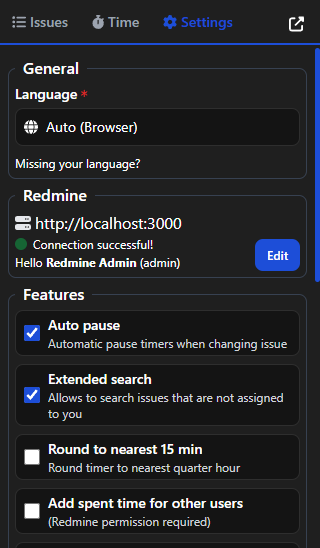
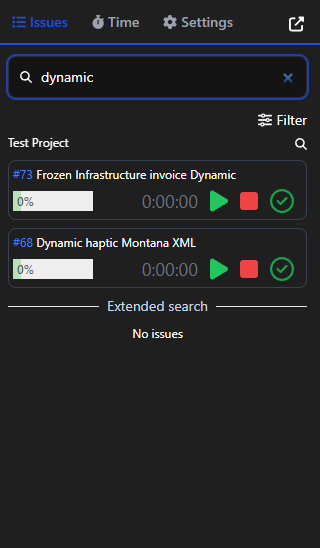
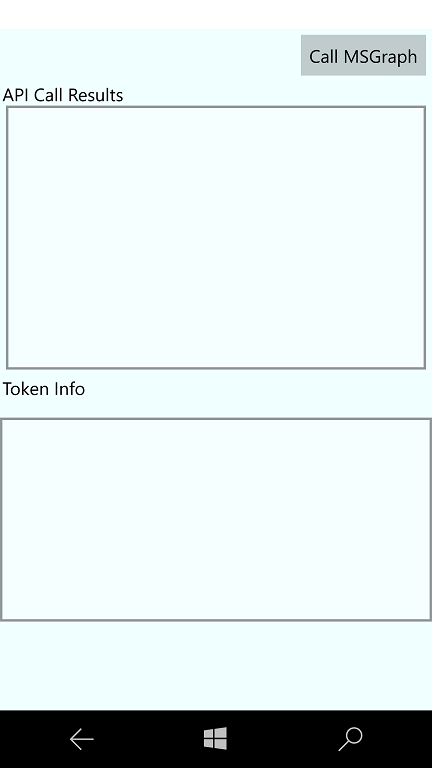
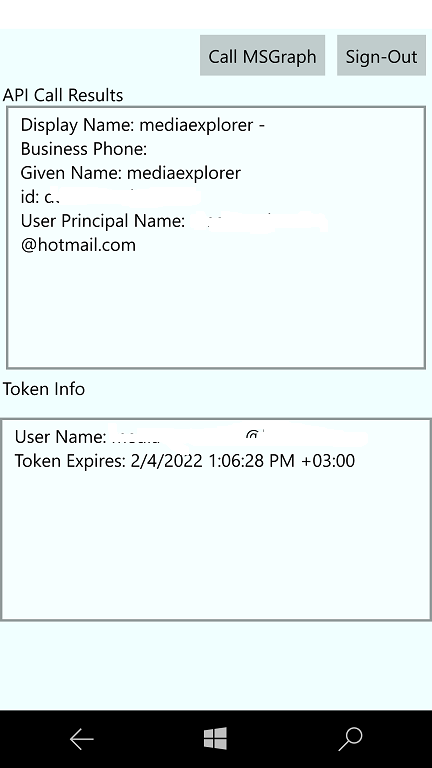
Screenshots
Progress
Microsoft.Graph project added (obsolete… but works)
Microsoft.Graph.Core project added (obsolete too)
Proof-of-concept
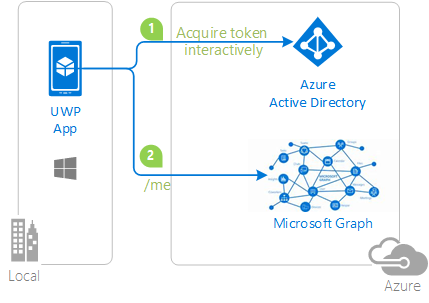
Architecture
Prerequisites
To run the completed project in this folder, you need the following:
Visual Studio installed on your development machine. If you do not have Visual Studio, visit the previous link for download options. (Note: This tutorial was written with Visual Studio 2019 version 16.5.0. The steps in this guide may work with other versions, but that has not been tested.)
Either a personal Microsoft account with a mailbox on Outlook.com, or a Microsoft work or school account.
If you don’t have a Microsoft account, there are a couple of options to get a free account:
Register a native application with the Azure Active Directory admin center
Open a browser and navigate to the Azure Active Directory admin center and login using a personal account (aka: Microsoft Account) or Work or School Account.
Select Azure Active Directory in the left-hand navigation, then select App registrations under Manage.
Select New registration. On the Register an application page, set the values as follows.
Set Name to UWP Graph Tutorial.
Set Supported account types to Accounts in any organizational directory and personal Microsoft accounts.
Under Redirect URI, change the dropdown to Public client (mobile & desktop), and set the value to https://login.microsoftonline.com/common/oauth2/nativeclient.
Choose Register. On the UWP Graph Tutorial page, copy the value of the Application (client) ID and save it, you will need it in the next step.
Project description goes here. This description is usually two to three lines long. It should give an overview of what the project is, eg technology used, philosophy of existence, what problem it is trying to solve, etc. If you need to write more than 3 lines of description, create subsections.
** NOTICE: ** put here a message that is very relevant to users of the project, if any.
Features
Here you can place screenshots of the project. Also describe your features using a list:
Easy integration;
Few dependencies;
Beautiful template-english with a nice README;
Great documentation and testing?
Getting started
1. First step to get started
Usually the first step to get started is to install dependencies to run the project. Run:
apt get install dependency
It is recommended to place each command on a different line:
apt get install something else
This way users can copy and paste without reading the documentation (which is what usually happens).
2. Other step(s)
Usually the next steps teach you how to install and configure the project for use / development. Run:
Your help is most welcome regardless of form! Check out the CONTRIBUTING.md file for all ways you can contribute to the project. For example, suggest a new feature, report a problem/bug, submit a pull request, or simply use the project and comment your experience. You are encourage to participate as much as possible, but stay tuned to the code of conduct before making any interaction with other community members.
See the ROADMAP.md file for an idea of how the project should evolve.
License
This project is licensed under the MIT open-source license and is available for free.
Changelog
See all changes to this project in the CHANGELOG.md file.
Similar projects
Below is a list of interesting links and similar projects:
If you want to add more languages or extend existing ones, feel free to contribute. Just create a pull request with the desired changes. The language files are located under src/lang and public/_locales.
Important: Create below directories within minikube vm, by logging into the vm.
These directories are for dags/logs folder and we will be mounting these into pods for sharing & persistence.
This has to be done every time you restart minikube.
You can avoid this by creating a mount from your local mac to above path in minikube vm.
For demo, i am sticking with this manual step.
Setup dependent repo
This repo has ElasticWorker/ElasticWorkerAutoscaler CRD and controllers code.
git clone https://github.com/sarweshsuman/elastic-worker-autoscaler.git
cd elastic-worker-autoscaler/
make
make install
make docker-build IMG=elastic-worker-controllers:0.1
make deploy IMG=elastic-worker-controllers:0.1
This compiles the controller code and builds image and deploys into minikube cluster namespace elastic-worker-autoscaler-system.
Validate pod is up and fine.
kubectl get pods -n elastic-worker-autoscaler-system
Setup custom metric APIserver adapter
This repo has custom metric adapter code which works closely with ElasticWorkerAutoscaler controller.
This setup can be replaced with Prometheus setup if moving into production.
git clone https://github.com/sarweshsuman/elastic-worker-custommetrics-adapter.git
cd elastic-worker-custommetrics-adapter/
GOOS=linux go build -o docker/
cd docker/
docker build -t elasticworker-custommetric-adapter:0.1 .
This builds custom metric adapter and creates a docker image.
Now we will deploy it into minikube.
cd ../manifest
kubectl create -f redis-metric-db.yaml
kubectl create -f elasticworker-adapter.yaml
This will trigger the DAG. If everything is fine, worker will execute it.
Note, you might see error in unpausing the dag, it is because scheduler has not yet picked the dag yet. If you retry this issue will go away. Alternatively, you could use -sd mention the subdirectory manully.
You can open the flower UI for checking the status of the cluster.
The enhanced Python fork of JILL — Julia Installer for Linux (and every other platform) — Light
Features
download Julia releases from the nearest mirror server
support all platforms and architectures
manage multiple julia releases
easy-to-use CLI tool
Install JILL
For the first time users of jill, you will need to install it using pip: pip install jill --user -U. Also use this to upgrade JILL version.
Python >= 3.8 is required. For base docker images, you also need to make sure gnupg is installed.
Installing Julias
When you type jill install, it does the following things:
query the latest version
download, verify, and install julia
make symlinks, e.g., julia, julia-1, julia-1.6
For common Julia users:
Get the latest stable release: jill install
Get the latest 1.y.z release: jill install 1
Get the latest 1.6.z release: jill install 1.6
Get the specific version: jill install 1.6.2, jill install 1.7.0-beta3
Get the latest release (including unstable ones): jill install --unstable
Note that for Julia 1.10, you’ll have to install it with jill install '"1.10"' because of the
python-fire limit.
For Julia developers and maintainers:
Get the nightly builds: jill install latest. This gives you julia-latest.
Checkout CI build artifacts of specific commit in the Julia Repository: jill install 1.8.0+cc4be25c (<major>.<minor>.<patch>+<build> with at least the first 7 characters of the
hash). This gives you julia-dev.
Some flags that can be useful:
No confirmation before installation: jill install --confirm
Download from Official source: jill install --upstream Official
Keep downloaded contents after installation: jill install --keep_downloads
Force a reinstallation: jill install --reinstall
The symlinks
To start Julia, you can use predefined JILL symlinks such as julia. jill install uses the following rule makes sure
that you’re always using the latest stable release.
Stable releases:
julia points to the latest Julia release.
julia-1 points to the latest 1.y.z Julia release.
julia-1.6 points to the latest 1.6.z Julia release.
For unstable releases such as 1.7.0-beta3, installing it via jill install 1.7 --unstable or
jill install 1.7.0-beta3 will only give you julia-1.7; it won’t make symlinks for julia or
julia-1.
To dance on edge:
julia-latest points to the nightly build from jill install latest
julia-dev points to the julia CI build artifacts from, for example, jill install 1.8.0+cc4be25c.
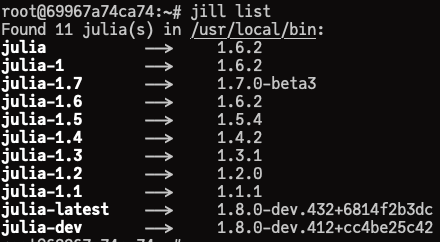
List symlinks and their target versions
jill list [version] gives you every symlinks and their target Julia versions.
Change symlink target
For non-windows system, you are free to use ln command to change the symlink targets. For Windows
it uses an entry .cmd file for this so you’ll need to copy them. In the meantime, jill switch
provides a simple and unified way to do this:
jill switch 1.6: let julia points to the latest julia 1.6.z release.
jill switch <path/to/my/own/julia/executable>: let julia points to custom executables.
jill switch 1.6 --target julia-1: let julia-1 points to the latest julia 1.6.z release.
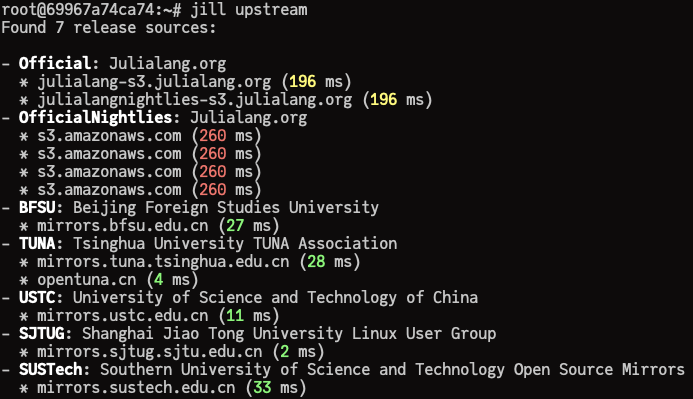
About downloading upstreams
By default, JILL tries to be smart and will download contents from the nearest upstream. You can
get the information of all upstreams via jill upstream. Here’s what I get in my laptop, I live in
China so the official upstreams aren’t so accessible for me 🙁
To temporarily disable this feature, you can use flag --upstream <server_name>. For instance,
jill install --upstream Official will faithfully download from the official julialang s3 bucket.
To permanently disable this feature, you can set environment variable JILL_UPSTREAM.
Note that flag is of higher priority than environment variable. For example, if JILL_UPSTREAM is
set to mirror server "TUNA", you can still download from the official source via jill install --upstream Official.
About installation and symlink directories
Here’s the default JILL installation and symlink directories:
system
installation directory
symlink directory
macOS
/Applications
~/.local/bin
Linux/FreeBSD
~/packages/julias
~/.local/bin
Windows
~\AppData\Local\julias
~\AppData\Local\julias\bin
For example, on Linux jill install 1.6.2 will have a julia folder in ~/packages/julias/julia-1.6
and symlinks julia/julia-1/julia-1.6 created in ~/.local/bin.
Particularly, if you’re using jill as root user, you will do a system-wide installation:
Installation directory will be /opt/julias for Linux/FreeBSD.
Symlink directory will be /usr/local/bin for Linux/FreeBSD/macOS.
To change the default JILL installation and symlink directories, you can set environment variables
JILL_INSTALL_DIR and JILL_SYMLINK_DIR.
(Deprecated)jill install also provides two flag --install_dir <dirpath> and --symlink_dir <dirpath>, they have higher priority than the environment variables JILL_INSTALL_DIR and
JILL_SYMLINK_DIR.
JILL environment variables
jill is made as a convenient tool and it can sometimes be annoying passing flags to it. There are
some predefined environment variables that you can use to set the default values:
Specify a default downloading upstream JILL_UPSTREAM: --upstream
The flag version has higher priority than the environment variable version.
Advanced: Example with cron
If you’re tired of seeing (xx days old master) in your nightly build version, then jill can
make your nightly build always the latest version using cron:
# /etc/cron.d/jill
PATH=/usr/local/bin:/usr/sbin:/usr/sbin:/usr/bin:/sbin:/bin
# install a fresh nightly build every day* 0 *** root jill install latest --confirm --upstream Official
Advanced: Registering a new public releases upstream
If it’s an public mirror and you want to share it worldwide to other users of JILL. You can add an
entry to the public registry, make a PR, then I will tag a new release
for that.
To add new private upstream, you can create a file ~/.config/jill/sources.json (fow Windows it is
~/AppData/Local/julias/sources.json) and add your own upstream configuration just like the JILL
sources.json does. Once this is done JILL will recognize this new
upstream entry.
fromjill.installimportinstall_juliafromjill.downloadimportdownload_package# equivalent to `jill install --confirm`install_julia(confirm=True)
# equivalent to `jill download`download_package()
You can read its docstring (e.g., ?install_julia) for more information.
FAQs
Why you should use JILL?
Distro package managers (e.g., apt, pac) is likely to provide a broken Julia with incorrect
binary dependencies (e.g., LLVM ) versions. Hence it’s recommended to download and extract the
Julia binary provided in Julia Downloads. jill.py doesn’t do
anything magical, but just makes such operation even stupid.
Why I make the python fork of JILL?
At first I found myself needing a simple tool to download and install Julia on my macbook and
servers in our lab, I made my own shell scripts and I’d like to share it with others. Then I found
the jill.sh project, Abel knows a lot shell so I decide to contribute my macOS Julia
installer to jill.sh.
There are three main reasons for why I decided to start my Python fork:
I live in China. Downloading resources from GitHub and AWS s3 buckets is a painful experience.
Thus I want to support downloading from mirror servers. Adding mirror server support to jill.sh is
quite complicated and can easily become a maintenance nightmare.
I want to make a cross platform installer that everyone can use, not just Linux/macOS users. Shell
scripts doesn’t allow this as far as I can tell. In contrast, Python allows this.
Most importantly, back to when I start this project, I knew very little shell, I knew nothing
about C/C++/Rust/Go and whatever you think a good solution is. I happen to knew a few Python.
For some “obvious” reason, Julia People don’t like Python and I understand it. (I also don’t like
Python after being advanced Julia user for more than 3 years) But to be honest, revisiting this
project, I find using Python is one of the best-made decision during the entire project. Here is the
reason: no matter how you enjoy Julia (or C++, Rust), Python is one of the best successful
programming language for sever maintenance purpose. Users can easily found tons of “how-to”
solutions about Python and it’s easy to write, deploy, and ship Python codes to the world via PyPI.
And again, I live in China so I want to rely on services that are easily accessible in China, PyPI
is, GitHub and AWS S3 bucket aren’t. A recent Julia installer project juliaup written in Rust
solves the Python dependency problem very well, but the tradeoff is that juliaup needs its own
distributing system (currently GitHub and S3 bucket) to make sure it can be reliably downloaded to
user machine. And for this it just won’t be as good as PyPI in the foreseeable future.
Is it safe to use jill.py?
Yes, jill.py use GPG to check every tarballs after downloading. Also, *.dmg/*.pkg for macOS
and .exe for Windows are already signed.
What’s the difference between jill.sh and jill.py
jill.sh is a shell script that works quite well on Linux x86/x64 machines. jill.py is
an enhanced python package that focus on Julia installation and version management, and brings a
unified user experience on all platforms.
Why julia fails to start
The symlink julia are stored in JILL predefined symlinks
dir thus you have to make sure this folder is in
PATH. Search “how to add folder to PATH on xxx system” you will get a lot of solutions.
How do I use multiple patches releases (e.g., 1.6.1 and 1.6.2)
Generally, you should not care about patch version differences so jill.py make it explicitly that
only one of 1.6.x can exist. If you insist to have multiple patch versions, you could use jill install --install_dir <some_other_folder> to install Julia in other folder, and then manually make
a symlink back. As I just said, in most cases, common users should not care about this patch version
difference and should just use the latest patch release.
How to only download contents without installation?
Use jill download [version] [--sys <system>] [--arch <arch>]. Check jill download --help for
more details.
Linux with musl libc
For Julia (>= 1.5.0) in Linux with musl libc, you can just do jill install and it gives you the
right Julia binary. To download the musl libc binary using jill download, you will need to pass
--sys musl flag.
MacOS with Apple silicon (M1)
Yes it’s supported. Because macOS ARM version is still of tier-3 support, jill.py will by default
install the x86_64 version. If you want to use the ARM version, you can install it via jill install --preferred-arch arm64.
CERTIFICATE_VERIFY_FAILED error
If you’re confident, try jill install --bypass-ssl.
Skip symbolic links generation
If for some reason you prefer to download julia without generating symbolic links jill install --skip-symlinks
Extending Kotlin/Multiplatform with native programming capabilities.
This library provides features including but not limited to:
Unmanaged memory API (Allocator, Memory and MemoryStack)
Foreign function API for calling native functions by address (FFI)
Shared library API for loading shared objects (SharedLibrary)
Native size types (NInt, NUInt and NFloat)
Native function types (CFn<F>)
Type safe pointers with constness (@Const and Ptr)
Calling convention modifiers for function pointers (@CDecl, @ThisCall, @StdCall and @FastCall)
Structure types (Struct)
Auto generated memory stack scopes (using MemoryStack)
Auto generated interop using @SharedImport, similar to DllImport in C#
Basic metaprogramming (@ValueType and typeOf<T>())
Function templates with monomorphization (@Template)
Memory access optimizations based on target platform
Function call optimizations based on target platform
Standalone ABI library for parsing and demangling kWire symbol data
This library does not support JS/WASM targets, and there is no plans on supporting it in the future.
If you know how to do it, feel free to contribute 🙂
How it works
ABI
The ABI part of the library is shared between the runtime and compiler plugin.
It implements shared type definitions and mechanisms for properly handling kWire symbols
which are embedded in the module data of the module being compiled with the kWire compiler plugin.
Runtime
On the JVM, the runtime implements/wraps around the Panama API available with Java 21+.
This allows easy interaction with platform-specific JVM code and a lot of opportunity for
optimizations which directly tie into the JIT compiler
On Android, the Panama API is not available out of the box.
For this reason, kWire uses a port of Project Panama to Android to substitute the
missing standard APIs
Special features like pinning on the JVM are implemented in the kWire Platform Binaries
as handwritten JNI intrinsics, since Panama doesn’t offer any alternatives.
On native targets, kWire uses a custom implementation built in Kotlin/Native and using
libffi for dispatching calls at runtime in an efficient manner, giving very acceptable
performance to builtin C-function calls in Kotlin/Native
Compiler Plugin
The compiler plugin is mainly responsible for lowering code.
This means transforming some higher-level concepts and calls into their actual implementation,
which is usually directly emitted in Kotlin (F)IR.
This allows kWire to implement features otherwise not possible due to limitations of the
Kotlin compiler.
Gradle Plugin
The Gradle plugin simply exists to inject the compiler plugin into the Kotlin compiler (daemon),
however it is planned to be extended with code generation capabilities similar to kotlinx.cinterop.
Special thanks to everyone involved in providing the libraries and tools
this project so heavily relies on, and for pouring countless hours of their
time into these projects.
Projekt je řešením klasického problému s batohem, ve kterém každź item má 2 parametry – cenu a váhu a batoh má omezenou kapacitu.
Úkolem je najít optimální řešení, při kterém předměty s maximální hodnotou zůstanou v batohu, s přihlédnutím ke kapacitě aktovky.
📚 Implementace:
Tento program řeší problém pomocí metody dynamického programování.
Řešení je připraveno pouze pro variantu úlohy 0-1, což znamená, že každá položka se může do portfolia dostat pouze 1x nebo vůbec.
Podstatou řešení je sestavení dvourozměrného pole (tabulky), které zohledňuje počet položek a kapacitu batohu, díky čemuž máme pomocí cyklů možnost rozdělit úkol na menší dílčí úkoly a vypočítat různé konfigurace pro batohy o velikostech od 1 do N.
Poté, co věci hodnotíme podle jejich hodnoty, určíme, která věc je pro dané místo v buňce nejlepší.
Po vyplnění tabulky bude naše odpověď v úplně poslední buňce tabulky.
📚 Funkce:
–help = Vypiše všechny možné příkazy, které je možné použit v programu.
–run = Spuštění programu pomocí konfigurací ve formátu json. Je povoleno používat jak předpřipravené programy, tak své vlastní, umístěné před tím ve složce projektu.
–solve = Spuštění programu pomocí zadaní proměnných, včetně počtu objektů, jejich názvu, ceny, hmotnosti a kapacity batohu.
–tests = Spuštění připravených testů pro různé případy toku programu.
Program používá 1 vlákno.
Bohužel se mi nepodařilo rozdělit dvourozměrné pole do více vláken, ale v jiných typech implementace je to docela možné.
Měření byla provedena na: Intel(R) Core(TM) i7-9750H CPU @ 2.60GHz 2.59 GHz 6 Core(s), 12 threads. CLion.
items count
knapsack size
result(ms)
10
10
0
100
1000
3
250
10000
9
📚 Knihovny:
V projectu byli použity knihovny (ve složce /lib):
jsoncpp = pro čtení configurace batohu a itemu ve formatu json,
googletest = pro testovací metody ve složce /Tests – jsou tam unit testy pro různé případy toku programu.


 https://github.com/mediaexplorer74/MSGraph