Keeping everyone updated with all kinds of news is the concept behind my application. The goal is to create a News Feed app that gives a user regularly-updated news from the internet related to a particular topic, person, or location. In this project, I have used the News API. This is a well-maintained API that returns information in a JSON format.
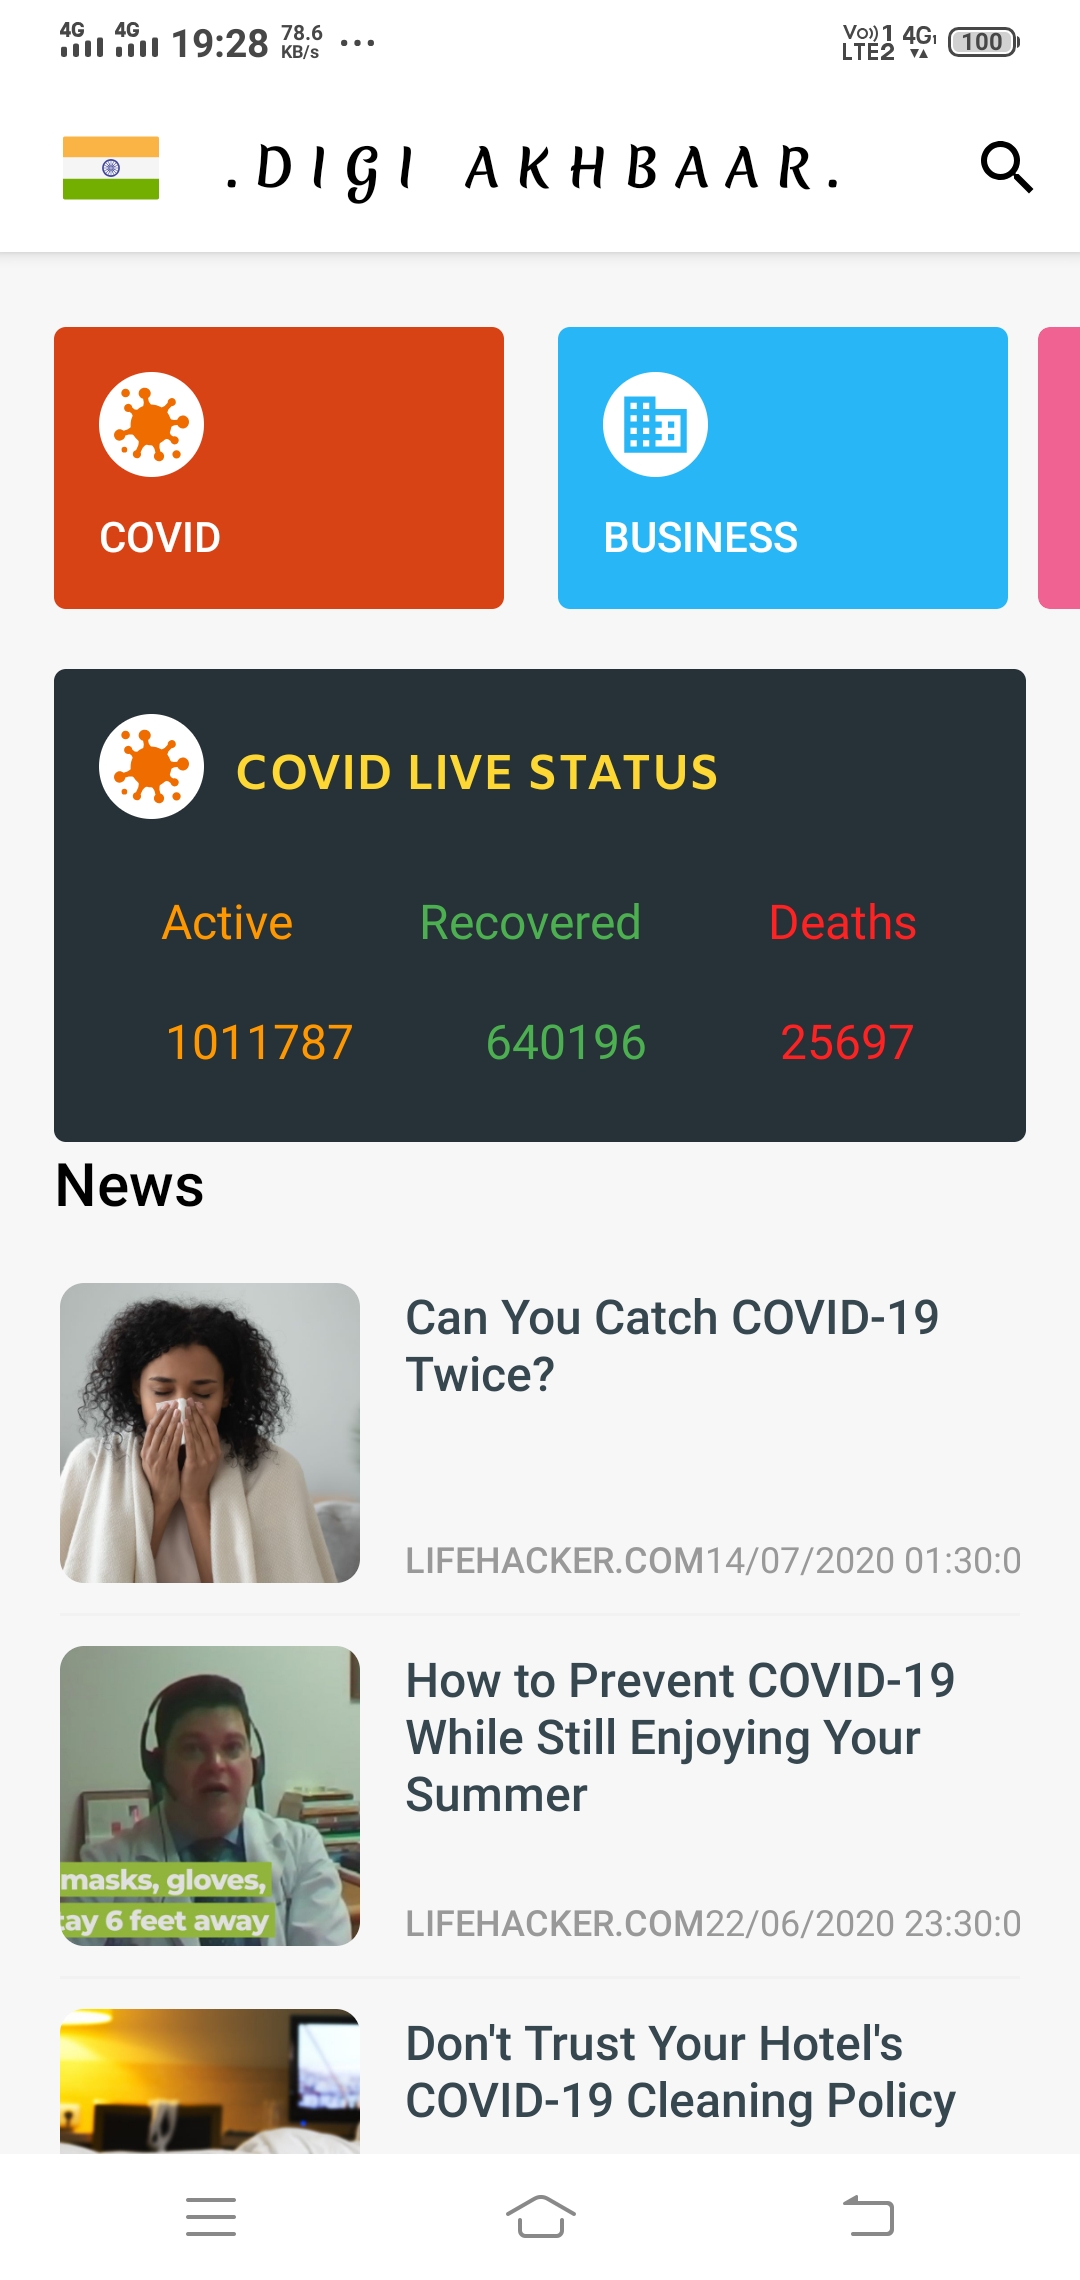
“Digi Akhbaar” as the name implies means “A Digital newspaper”. The “Digi Akhbaar App” comes up with many exciting features.
Features
1.) A very simple user-friendly UI that can be handled easily by a layman.
2.) Five different countries’ news is currently available in the app. The countries are India, Germany, the USA, the UK, and France.
3.) With the change of country or region, the language of the news also changes. For example: For Germany news, the app will automatically turn into german.
4.) Get live COVID updates of respective countries within the app.
5.) Users can search for any news using the search bar.
6.) Usage of retrofit and news API makes news feed appear both quickly and with less traffic.
7.) Fast and secure browsing of news is available in the app itself. Users can view the complete news within the app itself.
8.) The app is completely available for all android versions starting from Android 4.0 to Android 10.0, satisfying 98.1 % of the whole world users.
9.) Users can browse the news based on categories like Entertainment, business, etc.
10.) The app size is around 5mb which makes the user not spend much data to download.
11.) Above all the benefits the app is really fast and easy to handle.
The typical Redux patterns entail a lot of boilerplate. The documented and accepted patterns for reducing boilerplate really just swap one kind for another:
Redux Example
Consider the following Redux example that creates a store with two numbers: foo which may be incremented and bar which may be decremented.
Standards for this project, including tests, code coverage, and semantics are enforced with a build tool. Pull requests must include passing tests with 100% code coverage and no linting errors.
Fingerprints (renames) files based on their content using MD5 hash-based cache busting file names.
Replaces references in files to original file names with their MD5 hash-based file names.
Optionally outputs a manifest file to buster.manifest.json.
Simple and intuitive configuration using .buster.json.
Invokable via the command line and scriptable.
Easily integrates into your project workflow.
Installation
Install Globally
This is the ideal solution if you want to use Buster as a general utility from the command line.
$ npm install -g @4awpawz/buster
Install Locally
This is the ideal solution if you want to integrate Buster into your project.
$ npm install --save-dev @4awpawz/buster
Important
Buster Is Destructive. Buster does not make backups of your files. Buster performs its operations directly on the files that operational directives indicate. See “A Typical Buster Workflow” below.
Versions prior to v1.1.0 generated hashes based solely on the content of the files targeted by its operational directives. This opened up the opportunity for clashes on files that had no content. To address this issue, beginning with v1.1.0, Buster will generates unique hashes for all files by including the path of the file targeted by operational directives as well as its content.
Buster Primer
Site Relative File Paths And Site Relative URLs
In the documentation that follows, references are made to site relative file paths and to site relative URLs.
“site relative file paths” pertain strictly to your project’s file structure. They are used to declare the input in operational directives when declaring the file paths to assets in your project that you want targeted by Buster for cache busting.
“Site relative URLs” pertain strictly to your website’s runtime environment and are used to reference assets throughout your site (e.g. the src attribute of an img tag, the href attribute of a link tag, the URL() CSS function declared inside of a CSS stylesheet).
The important thing here is to understand that in order for Buster to perform its cache busting you, the developer, must insure that your site employs site relative URLs when referencing its assets. This is because Buster converts your site relative file paths to site relative URLs which it then uses to search the content of your site’s files for site relative URLs that need to be updated to point to the assets it has fingerprinted with unique hashes.
A Typical Buster Work Flow
Your development build tool generates your production ready site (as opposed to development) into your project’s release folder. When configuring Buster to cache bust your site, you would target your project files in the release folder by using site relative file paths in your Buster configuration’s operational directives. Then from the root of your project you can use the command line to run Buster to cache bust your site in the release folder. You can then run your site from the release folder to insure that it is functioning as expected and once it is determined that it is functioning as expected you can then deploy your site directly from the release folder to its server using a command line utility such as rsync.
In a typical website project with the following or similar project structure
the site relative file path used in an operational directive to target housecat.jpg would be release/media/housecat.jpg and the site relative URL used to identify the image file in the browser would be media/housecat.jpg.
Operational Directives
Buster employs a concept called an Operational Directive, abbreviated od, which you declare in your .buster.json configuration file and which Buster uses to direct the operations it performs on your project’s files. Each od is comprised of 2 parts, an input, and an operation.
Input
A site relative file path to one or more files.
Supports globs/wildcard patterns.
Important Buster assumes that all site relative file paths are relative to process.cwd().
Important Buster implements its glob support using node package glob. Please refer to node package glob should you need additional information on using globs with Buster.
Operation
Indicates the actions that Buster is to perform on the od’s input file(s). It is a number preceded by a colon which separates the number from the input (e.g. “:1”). The following 3 operations are currently supported:
:1
Apply this operation only to those files whose own file names are to be fingerprinted for cache busting purposes (e.g. .jpg, .gif, .map).
The format of each unique MD5 hash-based file name will be [original file’s base name].[unique hash].[original file’s extension] (e.g. cat.[unique hash].jpg). Should the original file’s base name contain 1 or more periods (e.g. main.js.map) the format of the MD5 hash-based file name will, as an example, be main.[unique hash].js.map.
:2
Apply this operation only to those files whose contents are to be searched for site relative URLs that point to assets whose file names have been fingerprinted and therefor need to be updated and whose own file names are not to be fingerprinted for cache busting purposes (e.g. .html).
:3
Apply this operation only to those files whose own file names are to be fingerprinted for cache busting purposes and whose contents are to be searched for site relative URLs that point to assets whose file names have been fingerprinted and therefor need to be updated (e.g. .css).
Hashed File Name Format
The format of each unique MD5 hash-based file name will be [original file’s base name].[unique hash].[original file’s extension] (e.g. cat.[unique hash].jpg). Should the original file’s base name contain 1 or more periods (e.g. main.js.map) the format of the MD5 hash-based file name will, as an example, be main.[unique hash].js.map.
Operational Directive Examples
Example Operational Directives Using Site Relative File Path:
Given the following project structure
|- myproject
|- |- release/
|- |- |- media/
|- |- |- |- housecat.jpg
|- |- |- index.html => contains img tag with a site relative url for its src i.e. <img src="https://github.com/media/housecat.jpg">
|- |- .buster.json
and running Buster from the command line in the myproject folder with the following operational directives
This release only encompasses changes to the project’s README.md file, specifically for the addition of the solicitation to ‘Buy me a coffee’.
v1.1.1
This release only encompasses changes to the project’s documentation in this README.md file.
v1.1.0
This release includes an improved hashing algorithm that generates unique hashes for all files, including those that have no content.
v1.0.0
This is the first major release of Buster and incorporates many breaking changes from prior versions. Most notably, prior versions had a “safe mode” configuration option that would instruct Buster to cache bust “in place”, meaning that it would not create backups and would not be able to restore files to their prior state. As it turns out, the vast majority of Buster’s users are using “safe mode” because it fits their workflow of generating their site into a dedicated folder that can be cache busted and that could easily be repopulated by just regenerating the site. These changes were implemented to refactor Buster to precisely match this typical workflow.
v0.3.1
This release addresses fixes for security warnings for packages used internally by Buster only. There are no changes to the code base.
v0.3.0
This release addresses one bug and fixes for security warnings for packages used internally by Buster only. Also landing with this release is reduced console output; use the verbose config option if needed.
Major bug fixes:
Addresses issue #14 which could cause Buster to mangle hashed file names. Please note that beginning with this release, Buster now generates hashed file names as [hash]-[file name].[file extension]. You are strongly advised to upgrade your projects and rebuild them.
v0.2.4
This release addresses fixes for security warnings for packages used internally by Buster only. There are no changes to the code base.
v0.2.3
Major bug fixes:
Addresses issue #13 which would cause Buster to crash when reading a configuration file that doesn’t exist.
Addresses issue #12 which would cause Buster to crash when setting paramsConfig to a default value of {} to indicate that it wasn’t passed.
v0.2.2
This release includes no changes to the code base.
Addresses issue #11 which seeks to lockdown all project dependencies including descendants using NPM’s shrinkwrap.
v0.2.1
Major and minor bug fixes – includes but not limited to the following:
Addresses issue 10 which would cause buster to fail when reading command line configuration data belonging to the application that launched it with paramsConfig.
Addresses issue #9 which would sometimes cause restore to fail. This fix totally replaces the one introduced in v0.2.0, and now handles the issue earlier in the restore processing cycle.
v0.2.0
Major refactor – includes but not limited to the following:
This repository contains the Auth0 Quickstarts, but most other documentation content in this repository is no longer up to date, and is not the source of content at https://auth0.com/docs. Pull requests and issues for Quickstarts can still be submitted here, but most other content is no longer hosted on GitHub and therefore no longer open-source. If you are an Auth0 employee trying to make a change to other documentation, please submit a ticket or contact the Documentation Team to request access to our content management system.
If you are looking for the application that hosts the Docs content, see auth0-docs.
If you would like to modify the Management API v2 API docs, they are generated from the api2 repository.
Both of the above repositories require team access.
Editing Docs Content
Auth0 Docs are no longer maintained in this Github repository. Employees can request access to our content management system to update Docs directly. Outside contributors can submit requests under the Issues section in this repository.
Editing Quickstart Content
You can edit the Quickstarts by using the GitHub web editor and editing a file. This is best suited for typos and small changes.
You can also pull down the /docs repo to your computer via Git and edit files in your local editor before pushing a new branch (or a branch to your own fork of the project). You can then go to GitHub.com and start a PR. We will be able to review the changes in a Heroku test application prior to merging.
Lastly, you can run and test the docs site locally (access available to Auth0 employees only). This option is best suited for repeat contributors or for complex contributions. You gain the benefit of locally testing and viewing your changed or added pages, navigation, and config, but you also gain the complexity of dealing with the local docs app, setting it up, and keeping it updated.
Regardless of which option you use, please review any relevant sections of the Contributing Guidelines before sending a PR.
Issue Reporting
If you find a bug or inaccuracy in the documentation content, please report it in this repository’s issues section. Please do not report security vulnerabilities on the public GitHub issue tracker. The Responsible Disclosure Program details the procedure for disclosing security issues.
I just shared the example project on Expo, simply run on your device to check what it is:
via Expo OR
check the code, and yes! 🙂 all of the images, screenshots are directly taken
from the this example. Of course, you can simply clone the project and run the example on your own environment.
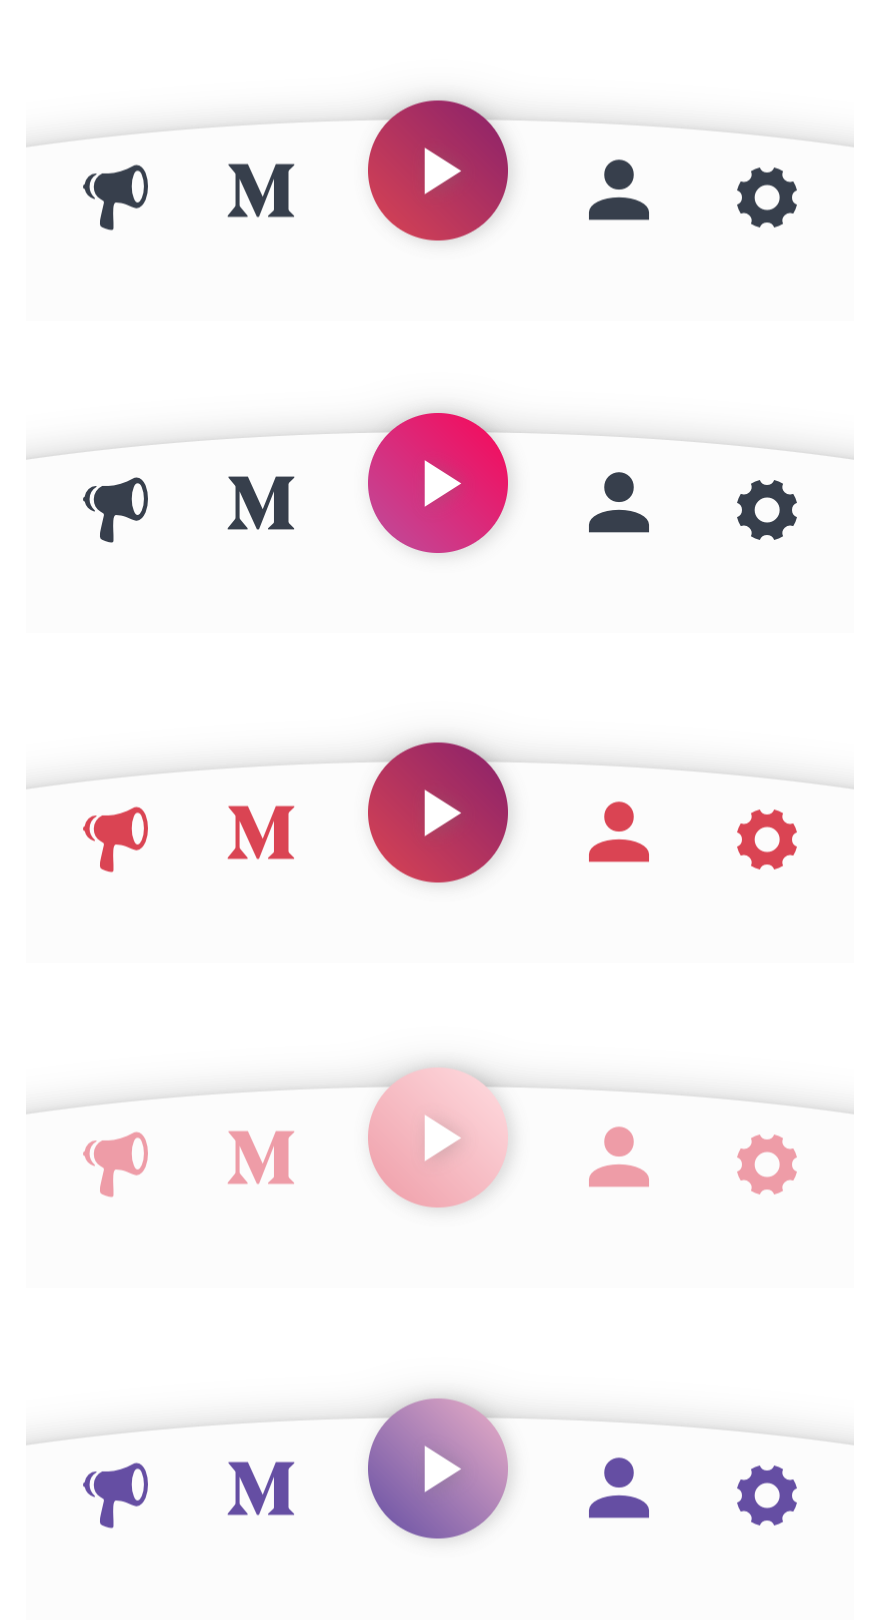
Configuration – Props
BottomBar:
Property
Type
Default
Description
style
style
container
use this to change the main BottomBar’s style
shapeStyle
style
bottom:89
use this to change the main BottomBar’s Shape style
shapeColor
color
#FBFBFD
use this to change the unique shape’s color
mainIcon
component
icon
changes the main big button’s icon type
mainIconColor
color
#FFFFFF
changes the main big button’s icon color
mainIconGradient
array
blue gradient
changes the main big button’s gradient color
mainIconComponent
component
MainIconButton(Gradient Icon based button)
Make your own button on the main one
miniButtonsColor
color
null
changes the mini buttons color with a single prop
firstIconComponent
component
MiniButton(simple icon button)
renders your own component as a first button
secondIconComponent
component
MiniButton(simple icon button)
renders your own component as a second button
thirdIconComponent
component
MiniButton(simple icon button)
renders your own component as a third button
fourthIconComponent
component
MiniButton(simple icon button)
renders your own component as a fourth button
disableFirstIcon
boolean
false
disable the first icon button
disableSecondIcon
boolean
false
disable the second icon button
disableThirdIcon
boolean
false
disable the third icon button
disableFourthIcon
boolean
false
disable the fourth icon button
Credits
Thank you RN Typography Team for the ShowcaseScreen 🙂 It has a great design.
Kelvin is a little helper bot who will automate the lights in your house. Its job is to adjust the color temperature and brightness in your home based on your local sunrise and sunset times and custom intervals defined by you. Think of it as f.lux or Apple’s Night Shift for your home.
Imagine your lights shine in an energetic but not too bright blue color to get you started in the early morning. On sunrise your lights will change to a more natural color temperature to reflect the sunlight outside. On sunset they will slowly fade to a warmer and softer color scheme perfectly suited to Netflix and chill. When it’s time to go to bed Kelvin will reduce the intensity even more to get you into a sleepy mood. It will keep this reduced setting through the night so you don’t get blinded by bright lights if you have to get up at night…
Features
Adjust the color temperature and brightness of your lights based on the local sunrise and sunset times
Define fine grained daily schedules to fit your personal needs throughout the day for every single room
Define a default startup color and brightness for your lights
Gradual light transitions you won’t even notice
Works with smart switches as well as conventional switches
Activate via Hue Scene or automatically for every light you turn on
Respects manual light changes until a light is switched off and on again
Auto upgrade to seamlessly deliver improvements to you
Small, self contained binary with sane defaults and no dependencies to get you started right away
Free and open source
Getting started
If you want to give Kelvin a try, there are some things you will need to benefit from its services:
Supported Philips Hue (or compatible) lights
A configured Philips Hue bridge
A permanently running computer connected to your network (See Raspberry Pi)
Got all these? Great, let’s get started!
Installation
Download the latest version of Kelvin from the Releases page.
Extract the Kelvin archive.
Start Kelvin by double-clicking kelvin.exe on Windows or by typing ./kelvin in your terminal on macOS, Linux and other Unix-based systems.
You should see an output similar to the following snippet:
2017/03/22 10:45:41 Kelvin v1.1.0 starting up... 🚀
2017/03/22 10:45:41 Looking for updates...
2017/03/22 10:45:41 ⚙ Default configuration generated
2017/03/22 10:45:41 ⌘ No bridge configuration found. Starting local discovery...
2017/03/22 10:45:44 ⌘ Found bridge. Starting user registration.
PLEASE PUSH THE BLUE BUTTON ON YOUR HUE BRIDGE...
Now you have to allow Kelvin to talk to your bridge by pushing the blue button on top of your physical Hue bridge. Kelvin will wait one minute for you to push the button. If you didn’t make it in time just start it again with step 3.
Once you pushed the button you should see something like:
2017/03/22 10:45:41 🤖 Kelvin starting up... 🚀
2017/03/22 10:45:41 🤖 Looking for updates...
2017/03/22 10:45:41 ⚙ Default configuration generated
2017/03/22 10:45:41 ⌘ No bridge configuration found. Starting local discovery...
2017/03/22 10:45:44 ⌘ Found bridge. Starting user registration.
PLEASE PUSH THE BLUE BUTTON ON YOUR HUE BRIDGE... Success!
2017/03/22 10:45:59 🤖 Devices found on current bridge:
2017/03/22 10:45:59 | Name                 |  ID | On    | Dimmable | Temperature | Color |
2017/03/22 10:45:59 | Dining table         |   5 | false | true     | true        | true  |
2017/03/22 10:45:59 | Power outlet         |   6 | false | false    | false       | false |
2017/03/22 10:45:59 | Window               |   1 | false | true     | true        | true  |
2017/03/22 10:45:59 | Kitchen              |   2 | false | true     | true        | true  |
2017/03/22 10:45:59 | Couch                |   3 | false | true     | true        | true  |
2017/03/22 10:45:59 | Desk                 |   4 | false | true     | false       | true  |
2017/03/22 10:45:59 Device Power outlet doesn't support any functionality we use. Exclude it from unnecessary polling.
2017/03/22 10:45:59 🌍 Location not configured. Detecting by IP
2017/03/22 10:45:59 🌍 Detected location: Hamburg, Germany (53.5553, 9.995).
2017/03/22 10:45:59 🤖 Starting cyclic update...
Wohoo! Kelvin is up and running! Well done!
Kelvin is now managing your lights and will gradually adjust the color temperature and brightness for you. Give it a try by switching lights on and off to see how Kelvin reacts. If you want to adjust the default schedule to your needs, just read on and edit the configuration.
Docker
As an alternative to manual installation you can also pull the official docker image from docker hub.
Get the image by running docker pull stefanwichmann/kelvin
Start a container via docker run -d -e TZ=Europe/Berlin -p 8080:8080 stefanwichmann/kelvin (replace Europe/Berlin with your local timezone)
docker ps should now report your running container
Run docker logs {CONTAINER_ID} to see the kelvin output (You can get the valid ID from docker ps)
To adjust the configuration you should use the web interface running at http://{DOCKER_HOST_IP}:8080/.
If you want to keep your configuration over the lifetime of your container, you can map the folder /etc/opt/kelvin/ to your host filesystem. If you alter the configuration you have to restart Kelvin through the web interface or by running docker restart {CONTAINER_ID}.
Configuration
Kelvin will create it’s configuration file config.json in the current directory and store all necessary information to operate in it. By default it is fully usable and looks like this:
As the configuration file is a simple text file in JSON format you can display and edit it with you favorite text editor. Just make sure you keep the JSON structure valid. If something goes wrong fix it using JSONLint or just delete the config.json and let Kelvin generate a configuration from scratch.
The configuration contains the following fields:
Name
Description
bridge
This element contains the IP and username of your Philips Hue bridge. Both values are usually obtained automatically. If the lookup fails you can fill in this details by hand. Learn more
location
This element contains the latitude and longitude of your location on earth. Both values are determined by your public IP. If this fails, is inaccurate or you want to change it manually just fill in your own coordinates.
schedules
This element contains an array of all your configured schedules. See below for a detailed description of a schedule configuration.
Each schedule must be configured in the following format:
Name
Description
name
The name of this schedule. This is only used for better readability.
associatedDeviceIDs
A list of all devices/lights that should be managed according to this schedule. Kelvin will print an overview of all your devices on startup. You should use this to associate your lights with the right schedule. ATTENTION: Every light should be associated to only one schedule. If you skip an ID this device will be ignored.
enableWhenLightsAppear
If this element is set to true Kelvin will be activated automatically whenever you switch an associated light on. If set to false Kelvin won’t take over until you enable a Kelvin Scene or activate it via web interface.
defaultColorTemperature
This default color temperature will be used between sunrise and sunset. Valid values are between 1000K and 6500K. See Wikipedia for reference values. If you set this value to -1 Kelvin will ignore the color temperature and you can change it manually. ATTENTION: The supported color temperature minimum will vary between bulb models. Kelvin will respect these limits automatically.
defaultBrightness
This default brightness value will be used between sunrise and sunset. Valid values are between 0% and 100%. If you set this value to -1 Kelvin will ignore the brightness and you can change it manually.
beforeSunrise
This element contains a list of timestamps and their configuration you want to set between midnight and sunrise of any given day. The time value must follow the hh:mm format. colorTemperature and brightness must follow the same rules as the default values.
afterSunset
This element contains a list of timestamps and their configuration you want to set between sunset and midnight of any given day. The time value must follow the hh:mm format. colorTemperature and brightness must follow the same rules as the default values.
After altering the configuration you have to restart Kelvin. Just kill the running instance (Ctrl+C or kill $PID) or send a HUP signal (kill -s HUP $PID) to the process to restart (unix only).
Kelvin Scenes
Kelvin has the ability to detect certain light scenes you have programmed in your hue system. If you activate one of these Kelvin scenes it will take control of the light and manage it for you. You can use this feature to reactivate Kelvin after manually changing the light state or to associate Kelvin with a certain button on your Hue Tap for example.
In order to use this feature you have to create a scene in your Hue System via a Hue app. The name of this new scene has to contain the word kelvin and the name of the schedule you want to control. Once you saved this scene Kelvin will associate all relevant lights to it and update the state every minute to fit your schedule. Now you can simple activate this scene whenever you want to active Kelvin.
Let’s look at an example:
Let’s assume you have a schedule called livingroom which should be activated only on the second tap of your Hue Tap.
Start a Hue app on your smartphone and create a new scene called Activate Kelvin in Livingroom or Livingroom (Kelvin). The exact name doesn’t matter as long as the words kelvin and the name of the schedule are part of this scene name.
Associate the new scene to the second tap on your Hue Tap and set the configuration value enableWhenLightsAppear to false in the schedule livingroom.
Restart Kelvin to activate the new configuration.
From now on Kelvin will only take control of the lights in the schedule livingroom if you activate the scene on the second tap.
Raspberry Pi
A Raspberry Pi is the perfect device to run Kelvin on. It’s cheap, it’s small and it consumes very little energy. Any model of the Raspberry Pi will be sufficient, but we don’t provide binary releases for revision 1 and the first generation Raspberry Pi Zero anymore. To set up Kelvin on a Raspberry Pi follow the installation guide here. Once your Raspberry Pi is up and running (booting, connected to your network and the internet) download the latest linux_armv7 release and follow the steps in Installation.
Systemd setup on a RaspberryPi
Running Kelvin as a systemd process provides an easily managed background process.
Install path for Kelvin binary is /home/pi/kelvin/kelvin
Logged in as pi user, and have sudo user permissions
Setup
# Fetch release
wget https://github.com/stefanwichmann/kelvin/releases/download/v1.3.4/kelvin_1.3.4_linux_armv5.tar.gz -O /tmp/kelvin-arm.tar.gz
# Create user to run as
sudo adduser --system --group --shell /bin/nologin --no-create-home --home /opt/kelvin kelvin
# Install
sudo mkdir -p /opt/kelvin
cd /opt/kelvin
sudo tar -xvzf /tmp/kelvin-arm.tar.gz
sudo mv kelvin-linux-arm*/*.
sudo rmdir kelvin-linux-arm*
sudo chown -R kelvin:kelvin /opt/kelvin
# Create service file for systemd
sudo cp etc/kelvin.service /etc/systemd/system/kelvin.service
# Start, then press hue button. Restart if necessary
sudo systemctl start kelvin
# Start on boot
sudo systemctl enable kelvin
# Confirm status
sudo systemctl status kelvin
# Clean up
rm /tmp/kelvin-arm.tar.gz
# Edit config to taste
sudo -u kelvin -e /opt/kelvin/config.json
sudo systemctl restart kelvin
# Read Logs
journalctl -fu kelvin.service
If you are using Kelvin on a different system with Systemd you have to adjust the kelvin.service file according to your needs.
Troubleshooting
If anything goes wrong keep calm and follow these steps:
Make sure the Philips Hue bridge is configured and working in your network. Kelvin will need it to communicate with your lights. If you got the Hue app running on your smartphone you should be fine. Otherwise follow the Philips Hue manual to configure your lights.
To identify the IP address of your bridge open this link in your browser. After you got the IP address enter http://<bridge IP address>/debug/clip.html into your browser. You should see the debug page of you hue bridge. If this fails please follow the Philips Hue manual to configure your bridge.
Make sure the Philips Hue bridge is reachable from the computer Kelvin will run on. Enter the command ping <bridge IP address> in a terminal window or on a remote console. You should see packages reaching the destination IP address. If this fails you might have a network issue.
Make sure you downloaded the latest release for your operating system and CPU architecture. If you are not sure stick to the most appropriate amd64 release or arm if you are using a Raspberry Pi.
If all this doesn’t help, feel free to open an issue on github.
How Kelvin works
In order to decide if Kelvin suits your needs and works in your setup, it helps to understand it’s inner workings and behavior. In a nutshells Kelvin uses your Philips Hue bridge to talk to all the Hue lights in your home and will automatically configure them according to the schedules in your configuration file. In order to do this it will request the current state of every light every two seconds. For this state Kelvin differentiates three possible scenarios:
The light is turned on: Kelvin will calculate the appropriate color temperature and brightness, send it to the light and safe this state.
The light is turned on but it’s state was changed since the last update: Kelvin detects that you have manually changed the state (for example by activating a custom scene) and will stop managing the state for you.
The light is turned off: Kelvin will clear the last known state and do nothing.
Development & Participation
If you want to tinker with Kelvin and it’s inner workings, feel free to do so. Kelvin uses the Go Modules support built into Go 1.11. To get started you can simply clone the main repository outside of GOPATH by executing the following commands (feel free to change src to the directory of your choice):
mkdir $HOME/src
cd $HOME/src
git clone https://github.com/stefanwichmann/kelvin.git
cd kelvin
go build
Make sure you have set up your go development environment by following the steps in the official documentation.
If you have ideas how to improve Kelvin I will gladly accept pull requests from your forks or discuss them with you through an issue.
Time Slime is a C library for implementation of a basic time sheet program.
It uses an SQLITE database to store logs, and allows you to clock in/out as well as add a set number of hours.
There is also a shell interface for using only the library from the terminal.
Getting Started
To use this as a library in another program, you need the timeslime.h and timeslime.c files.
If your project already includes SQLITE, then replace this line, in timeslime.h:
#include"third_party/sqlite3/sqlite3.h"
With:
#include"path/to/sqlite3.h"
Pointing to your sqlite3.h file.
If your project is NOT using SQLITE, then you need to take third_party/sqlite3/sqlite3.h and third_party/sqlite3/sqlite3.c as well,
and change the path to sqlite3.h in timeslime.h based on where you place the files.
Building
To build the command line utility, you can just run:
make
on Windows or Linux.
Library Documentation
The Time Slime library has the following functions available for use:
TIMESLIME_STATUS_t is a type alias for int, and can be one of the following (defined in timeslime.h):
Value
Description
TIMESLIME_OK
No problems or errors
TIMESLIME_UNKOWN_ERROR
Unkown error prevented function from finishing
TIMESLIME_SQLITE_ERROR
Problem executing SQLITE actions
TIMESLIME_INVALID_YEAR
Invalid year in parameter object
TIMESLIME_INVALID_MONTH
Invalid month in parameter object
TIMESLIME_INVALID_DAY
Invalid day in parameter object
TIMESLIME_INVALID_HOUR
Invalid hour in parameter object
TIMESLIME_INVALID_MINUTE
Invalid minute in parameter object
TIMESLIME_ALREADY_CLOCKED_IN
Unable to clock in since a clock out action has not been performed
TIMESLIME_NOT_CLOCKED_IN
Unable to clock out since a clock in action has not been performed
TIMESLIME_NO_ENTIRES
No time sheet entries were found for a given date range
TIMESLIME_NOT_INITIALIZED
TimeSlime_Initialize(char[]) has not been called yet
If you want to get a string key that represents a status code,
use the TimeSlime_StatusCode(TIMESLIME_STATUS_t) method, and pass in the status code. A string will be returned.
Inititialization
The TimeSlime_Initialize(char[]) function needs to be called before any other Time Slime methods. This is responsible for creating the SQLITE database if it does not exist.
The parameter passed to this should be the directory to place the the timeslime.db file (WITHOUT a trailing slash).
Closing
The TimeSlime_Close() function needs to be called before exiting your program, it is responsible for safely disposing of allocated memory.
Adding Hours
It might be desired to add a set number of hours to a time sheet for a specific date (rather than clocking in and out).
This is where the TimeSlime_AddHours(float, TIMESLIME_DATE_t) functions comes in.
The function accepts a float, which is the number of hours worked. Then a TIMESLIME_DATE_t struct, which is the date to add the hours to.
Once build, if you add the executable (in the build folder) to your system PATH, you can run it with the following commands:
# Show information and command help> timeslime help# Add an amount of time to the current date> timeslime add [hours]
# Add an amount of time to a specific date> timeslime add [hours] [date]
# Clock in> timeslime clock in# Clock out> timeslime clock out
# Run a report> timeslime report [start-date] [end-date]
IMPORTANT: All dates must be formatted as either YYYY-MM-DD or YYYY/MM/DD
Todo
Better report formatting (done?)
Allow second parameter of a report to be “today”
Shell program to prompt user for choices if no parameters (or not all parameters) are given (but works on all systems)
Matio is an open-source C library for reading and writing binary MATLAB MAT files.
This library is designed for use by programs/libraries that do not have access or do not want to rely on MATLAB’s shared libraries.
If you are interested in collaborations, contact the maintainer via email (see section 1.1).
1.4 Questions and Reporting Bugs
Questions can be asked using the forums on the sourceforge site hosting matio.
Bugs, enhancements, etc. should be submitted using one of the trackers on the sourceforge page.
2.0 Building
This section describes how to build matio. Section 2.1 describes the dependencies, section 2.2 how to build/test matio, and section 2.3 documents the platforms matio has been tested on.
2.1 Dependencies
Matio has two optional dependencies. These are not required for the software to work, but without them some files may be unreadable. Zlib is required to read/write level 5 MAT files that use compression. HDF5 is required to work with newer MAT files that use the HDF5-format files.
2.1.1 zlib
To support compressed MAT files, zlib version ≥ 1.2.3 is required. The zlib software can be downloaded from http://zlib.net/.
2.1.2 HDF5
Support for MAT file version 7.3 requires the HDF5 library of version ≥ 1.8.x. This library can be downloaded from https://github.com/HDFGroup/hdf5/releases. Neither deprecated HDF5 1.6.x API functions nor HDF5 higher-level functions are called.
Building matio with HDF5 1.8.x requires configuration of HDF5 with default API v18.
Building matio with HDF5 1.10.x requires configuration of HDF5 with either default API v110 or with deprecated API v18.
Building matio with HDF5 1.12.x requires configuration of HDF5 with either default API v112, or with deprecated APIs v110 or v18.
Building matio with HDF5 1.14.x requires configuration of HDF5 with either default API v114, or with deprecated APIs v112, v110 or v18.
Building matio with HDF5 2.0.0 requires configuration of HDF5 with either default API v200, or with deprecated APIs v114, v112, v110 or v18.
For Ubuntu, sudo apt install libhdf5-dev should work fine.
2.2 Building matio
2.2.1 Quick Build Guide
The primary method for building the software is with GNU autotools using configure followed by make. After building, the testsuite can be executed to test the software using make check. The software can be installed using make install. For example,
git clone git://git.code.sf.net/p/matio/matiocd matiogit submodule update --init # for datasets used in unit tests./autogen.sh./configuremakemake checkmake install
If any of the tests in the testsuite fail, you should report the failure using the tracker (see section 1.4). You should attach the generated testsuite.log file to the bug report.
2.2.2 Configure Options
The configure script used to build the software takes a number of options. This section describes the key options.
--enable-mat73=yes
This flag enables the support for version 7.3 MAT files. The option only makes sense if built with HDF5 as support for version 7.3 files. It will be disabled if HDF5 is not available.
--enable-extended-sparse=yes
This option enables extended sparse matrix data types not supported in MATLAB. MATLAB only supports double-precision sparse data. With this flag, matio will read sparse data with other types (i.e. single-precision and integer types).
--with-matlab=DIR
This option specifies the directory (DIR) with the ‘matlab’ program. With this option, the testsuite will check that the MAT files written by matio can be read into MATLAB. Without this, the test will only check that matio can read the file written and if successful the test will be skipped. If matio can not read the file, the test will fail.
--with-zlib=DIR
This option specifies the prefix where zlib is installed (see section 2.1.1 for information about zlib).
--with-hdf5=DIR
This option specifies the prefix where the HDF5 software is installed (see section 2.1.2 for information about HDF5).
--with-default-file-ver=version
This option sets the default MAT file version (4,5,7.3) that will be used when writing. The default file version is used by the Mat_Create macro and the Mat_CreateVer function when MAT_FT_DEFAULT is used for the version argument.
--with-libdir-suffix=suffix
This option specifies a suffix to apply to library directories when installing and looking for dependent libraries (i.e. HDF5 and zlib). For example, some multi-arch Linux distributions install 64-bit libraries into lib64 and 32-bit libraries into lib.
2.2.3 CMake build system
The CMake build system is supported as an alternative build system, which usually consists of three steps for configuration, build and installation. By default, the CMake project is also configured for testing with CTest. For example,
git clone git://git.code.sf.net/p/matio/matiocd matiogit submodule update --init # for datasets used in unit testscmake .cmake --build .ctest --test-dir .cmake --install .
The following matio specific options for building with CMake are available.
MATIO_DEFAULT_FILE_VERSION:STRING=5
This option sets the default MAT file version (4,5,7.3) that will be used when writing.
MATIO_EXTENDED_SPARSE:BOOL=ON
This option enables extended sparse matrix data types not supported in MATLAB.
MATIO_MAT73:BOOL=ON
This flag enables the support for version 7.3 MAT files.
MATIO_PIC:BOOL=ON
This option enables position-independent code (PIC), i.e., compilation with the -fPIC flag. It is ignored for Visual Studio builds.
MATIO_SHARED:BOOL=ON
This option builds the matio library as shared object (i.e., a dynamic link library on Windows).
MATIO_WITH_HDF5:BOOL=ON
This option enables CMake to check for availability of the HDF5 library (see section 2.1.2 for information about HDF5).
MATIO_WITH_ZLIB:BOOL=ON
This option enables CMake to check for availability of the zlib library (see section 2.1.1 for information about zlib).
MATIO_BUILD_TESTING:BOOL=ON
This option enables the matio testsuite for CTest.
MATIO_ENABLE_CPPCHECK:BOOL=OFF
This option enables CMake ≥ 3.10 to perform static analysis with Cppcheck.
MATIO_USE_CONAN:BOOL=OFF
This deprecated option enables the Conan 1.X package manager to resolve the library dependencies.
To help CMake find the HDF5 libraries, set environment variable HDF5_DIR to the cmake/hdf5 directory (containing hdf5-config.cmake) inside the HDF5 build or installation directory, or call CMake with -DHDF5_DIR="dir/to/hdf5/cmake/hdf5". Alternatively call CMake with -DCMAKE_PREFIX_PATH="dir/to/hdf5/cmake". See the HDF5 documentation for more information. Using hdf5-config is recommended over using CMake’s built-in FindHDF5, especially for static builds. CMake 3.10 or later is recommended.
For Conan 2.X as dependency provider call CMake with -DCMAKE_PROJECT_TOP_LEVEL_INCLUDES=conan_provider. CMake 3.24 or later is required.
2.2.4 Visual Studio
Visual Studio solutions are provided as matio_vs2008.sln for VS2008 and as matio.sln for VS2010 (and newer). The Debug and Release configurations of both solutions are set up to build a DLL of the matio library (libmatio.dll) and the matdump tool and assume HDF5 is available in the directory specified by the HDF5_DIR environment variable. It is assumed that the shared libraries of HDF5 (and zlib) are available. If the static libraries of HDF5 (and zlib) are installed/built the macro H5_BUILT_AS_STATIC_LIB needs to be defined (instead of H5_BUILT_AS_DYNAMIC_LIB). Furthermore, the Release Lib configuration of the VS2010 solution is set up to build a static LIB of the matio library (libmatio.lib) and assumes that the static libraries of HDF5 (and zlib) are installed/built.
A testsuite is available when building with the GNU autotools. To run the testsuite, first configure and build matio. After building run make check to run the testsuite. If matio was built without zlib, the compressed variable tests will be skipped. If built without HDF5, the tests for version 7.3 MAT files will be skipped. If the path to the MATLAB application was not specified (--with-matlab), the write tests will fail if matio cannot read the file and skip if matio can read the file. The write tests will pass if MATLAB is available and can also read the file.
To report matio testsuite failures, compress the testsuite.log file in the test sub-directory of the build directory. Upload the compressed log file along with a bug report (see section 1.4 for information on reporting bugs).
2.3 Platforms
The library has been tested/used on Linux, Windows, and OS X including both little-endian and big-endian architecture.
3.0 License
This software is provided under a Simplified BSD license. See the COPYING file for details on the license.
MATLAB is a registered trademark of The MathWorks, Inc.
ℹ️ This project is not currently in development and has no
current plans for development. A successor to this project is
sentinel.
Vigilant is a free software Roblox game. It combines the gameplay features of MOBA and RTS games like Dota 2, or Warcraft III with the character mechanics of hero/class shooters such as Overwatch and Team Fortress 2 along with twin stick style controls similar to games like Alien Swarm, HELLDIVERS, or Magicka. This creates a unique gameplay experience where players cooperate using their heroes’ unique abilities to survive against relentless hordes of enemies.
Vigilant is a free to play cooperative game on Roblox designed to feel wholly unique among other games of the platform. It builds systems from the ground up to provide a striking experience that feels different than ‘just another Roblox game’. It achieves this through custom frameworks for controls, asset definition, replication, particle systems, game events/effects, and more. Overall, it aims to push the bar of what a Roblox game is percieved to be.
Usage
You can play the game on Roblox. There’s no need to install Vigilant to play, simply click play on the game page and Roblox will handle its own installation and get you into the game as quickly as possible.
Vigilant uses Rojo as a bridge between the filesystem and Roblox Studio. If you want to contribute or use Vigilant for development, install both to get started. The project contains a default.project.json that can be used by Rojo to generate or sync with a Roblox save file.
Documentation
The only documentation is currently in the source. This will be changing soon.
Contributing
Contributions are welcome, please make a pull request!
Be sure to set up Rojo to get started. Check out our contribution guide for further information.
progressr: An Inclusive, Unifying API for Progress Updates
The progressr package provides a minimal API for reporting
progress updates in R. The design is to
separate the representation of progress updates from how they are
presented. What type of progress to signal is controlled by the
developer. How these progress updates are rendered is controlled by
the end user. For instance, some users may prefer visual feedback
such as a horizontal progress bar in the terminal, whereas others may
prefer auditory feedback. The progressr framework is designed
to work out-of-the-box also with parallel and distributed processing,
especially with the futureverse ecosystem.
Design motto:
The developer is responsible for providing progress updates but it’s
only the end user who decides if, when, and how progress should be
presented. No exceptions will be allowed.
Two Minimal APIs – One For Developers and One For End-Users
Developer’s API
1. Set up a progressor with a certain number of steps:
p <- progressor(nsteps)
p <- progressor(along = x)
2. Signal progress:
p()               # one-step progress
p(amount = 0)     # "still alive"
p("loading ...")  # pass on a message
End-user’s API
1a. Subscribe to progress updates from everywhere:
handlers(global = TRUE)

y <- slow_sum(1:5)
y <- slow_sum(6:10)
1b. Subscribe to a specific expression:
with_progress({
  y <- slow_sum(1:5)
  y <- slow_sum(6:10)
})
Assume that we have a function slow_sum() for adding up the values
in a vector. It is so slow, that we like to provide progress updates
to whoever might be interested in it. With the progressr package,
this can be done as:
Note how there are no arguments (e.g. .progress = TRUE) in the
code that specify how progress is presented. This is by design and
because the only task for the developer is to decide on where in the
code it makes sense to signal that progress has been made. As we will
see next, it should be up to the end user, and end user only, of this
code to decide whether they want to receive progress updates or not,
and, if so, in what format. Asking them to specify a special
“progress” argument adds a lot of friction, it clutters up the code,
and, importantly, might not even be possible for end users to do
(e.g. they call a package function that in turn calls the progress
reporting function of interest).
Now, if we call this function, without further settings:
>y<- slow_sum(1:10)
>y
[1] 55>
the default is that there will be no progress updates. To get
progress updates, we need to request them to be “handled”, which we do
by:
By default, progressr presents progress via the built-in
utils::txtProgressBar(). It presents itself as a rudimentary
ASCII-based horizontal progress bar in the R terminal. See
help("handler_txtprogressbar") for how to customize the look of
“txtprogressbar”, e.g. colorization and Unicode. There are many other
ways to report on progress, including visually, auditory, and via
notification systems. You can also use a mix of these, e.g.
handlers(c("cli", "beepr", "ntfy"))
See the ‘Customizing How Progress is Reported’ vignette for for examples.
Additional Features
Support for progressr elsewhere
Note that progression updates by progressr is designed to work out
of the box for any iterator framework in R. See the different package
vignettes for details. Prominent examples are:
make packages that report progress via the cli package
(e.g. purrr) report progress via progressr
make knit() of the knitr package report via progressr
Use regular output as usual alongside progress updates
In contrast to other progress-bar frameworks, output from message(),
cat(), print() and so on, will not interfere with progress
reported via progressr. For example, say we have:
slow_sqrt<-function(xs) {
p<- progressor(along=xs)
lapply(xs, function(x) {
message("Calculating the square root of ", x)
Sys.sleep(2)
p(sprintf("x=%g", x))
sqrt(x)
})
}
This works because progressr will briefly buffer any output
internally and only release it when the next progress update is
received just before the progress is re-rendered in the terminal.
This is why you see a two second delay when running the above example.
Note that, if we use progress handlers that do not output to the
terminal, such as handlers("beepr"), then output does not have to be
buffered and will appear immediately.
Comment: When signaling a warning using warning(msg, immediate. = TRUE) the message is immediately outputted to the standard-error
stream. However, this is not possible to emulate when warnings are
intercepted using calling handlers. This is a limitation of R that
cannot be worked around. Because of this, the above call will behave
the same as warning(msg) – that is, all warnings will be buffered by
R internally and released only when all computations are done.
Sticky messages
As seen above, some progress handlers present the progress message as
part of its output, e.g. the “progress” handler will display the
message as part of the progress bar. It is also possible to “push”
the message up together with other terminal output. This can be done
by adding class attribute "sticky" to the progression signaled.
This works for several progress handlers that output to the terminal.
For example, with: