Author: a3qfw7cofdk7

  • poky-nuc-qemux86-64

    YOCTO (thud)

    The Yocto Project(r) is a Linux Foundation collaborative open source project whose goal is to produce tools and processes that enable the creation of Linux distributions for embedded and IoT software that are independent of the underlying architecture of the embedded hardware. The project was announced by the Linux Foundation in 2010 and launched in March, 2011, in collaboration with 22 organizations, including OpenEmbedded.[1]

    The Yocto Project’s focus is on improving the software development process for embedded Linux distributions. The Yocto Project provides interoperable tools, metadata, and processes that enable the rapid, repeatable development of Linux-based embedded systems in which every aspect of the development process can be customized.

    In October 2018, Arm Holdings partnered with Intel in order to share code for embedded systems through the Yocto Project.[2]

    1. Included layers

    2. Initialization of the build

    To do the initialization navigate to poky folder and run the oe-init-build-env command:

    cd poky
    source ./oe-init-build-env ../build

    The build directory should be one level higher specified with ../build

    3. Build

    To configure the kernel run bitbake linux-yocto -c menuconfig after this a shell should popup giving you possibilities to fine tune the kernel.

    Currently the version 4.14 is set as active, but there is support also for version 4.18 if you want new kernel with new features. To activate it simple comment the following lines from the local.conf file.

    PREFERRED_PROVIDER_virtual/kernel ?= "linux-yocto"
    PREFERRED_VERSION_linux-yocto ?= "4.14%"

    To do the build you need to:

    • create the image that runs on the board or inside the emulator
    • create the SDK that offers you possibilities to cross-compile your code for the board

    Here are the commands for building for weston shell support.

    # populate the sdk
    bitbake core-image-weston -c populate_sdk
    
    # generate image
    bitbake core-image-weston

    4. Docker machine for building this

    If you are comfortable with docker you can chose to run the build using a docker container and therefore not have your system bloated with the required tools to get the build running.

    The following Dockerfile has everything you need to get the build up and running.

    FROM ubuntu:18.04
    MAINTAINER Vlad Vesa<hello@vladvesa.ro>
    
    # INSTALL REQUIRED Yocto toolchain
    RUN apt-get update && apt-get install -y gawk wget git-core diffstat unzip texinfo gcc-multilib \
        build-essential chrpath socat cpio python python3 python3-pip python3-pexpect \
        xz-utils debianutils iputils-ping libsdl1.2-dev xterm
    
    # INSTALL GIT for cloning POKY
    RUN apt-get install -y git locales screen
    
    # Set the locale
    RUN sed -i -e 's/# en_US.UTF-8 UTF-8/en_US.UTF-8 UTF-8/' /etc/locale.gen && locale-gen
    ENV LANG en_US.UTF-8  
    ENV LANGUAGE en_US:en  
    ENV LC_ALL en_US.UTF-8   
    
    # add build script
    ADD init.sh /bin/init-yocto
    
    RUN groupadd -g 999 yocto && \
        useradd -r -u 999 -g yocto yocto
    USER yocto
    
    VOLUME [ "/build" ]
    
    WORKDIR /build
    
    CMD [ "/bin/bash" ]

    To run a build using docker you need to have the docker installed on your computer (please check docker site in order to clarify the required steps).

    I usually end up using the docker-compose allot because it gives me flexibility and short commands to remember.

    To start the container using docker-compose you need to do the followings:

    # make sure you are in the root directory of this repository
    docker-compose build
    docker-compose run yocto /bin/bash
    # from now on you can follow the commands presented earlier

    Visit original content creator repository
    https://github.com/vesavlad/poky-nuc-qemux86-64

  • calibre_annas_archive

    A Calibre store plugin for Anna’s Archive.

    📚 The largest truly open library in human history.
    ⭐️ We mirror Sci-Hub and LibGen. We scrape and open-source Z-Lib, DuXiu, and more.

    Installation

    From Releases

    To add this plugin, go to the latest release
    and download the file that looks like calibre_annas_archive-vx.x.x.zip where the x’s are the version number,
    then in Calibre go to Preferences > Plugins, click Load plugin from file and select your downloaded zip file.

    From source

    You could also install it from the source by cloning this repository and running:

    calibre-customize -b <path to cloned repo>

    or if you’re on Linux, you can run the shell script to create the zip file and then add that:

    ./zip_release.sh && calibre-customize -a $(ls calibre_annas_archive-v*.zip -1rt | tail -n1)

    Configuration

    You can change configuration by going to
    Preferences > Plugins > Store and scrolling down to and double-clicking Anna's Archive (x.x.x) by ScottBot10
    to open the settings menu.

    Search Options

    This plugin has the same search options as the actual site.
    For each checkbox option e.g. filetype, language: if no boxes are checked, then it doesn’t filter on that option.
    But if any are checked then it will only show results that match that selection.

    Download link options

    These options affect what files are shown in the downloads found by the search (the green arrow button).

    • Verify Content-Type: Make a HEAD request to each site and check if it has an ‘application’ Content-Type
    • Verify url extension: Check whether the url ends with the extension of the file’s format

    Mirrors

    This is a list of mirrors that the plugin will try, in the specified order, to access.
    You can change the order of, delete, and add mirror urls.

    Visit original content creator repository
    https://github.com/ScottBot10/calibre_annas_archive

  • Smart-Cam

    Smart-Cam

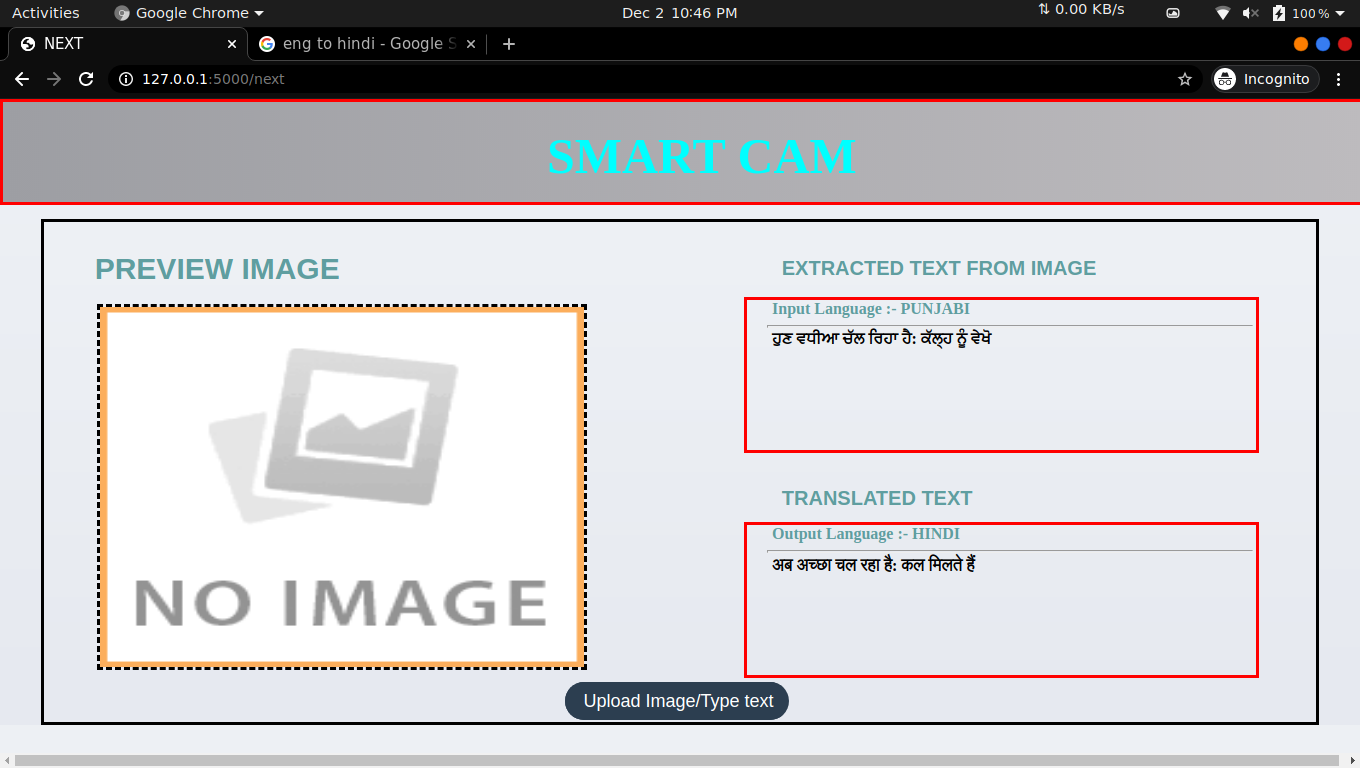
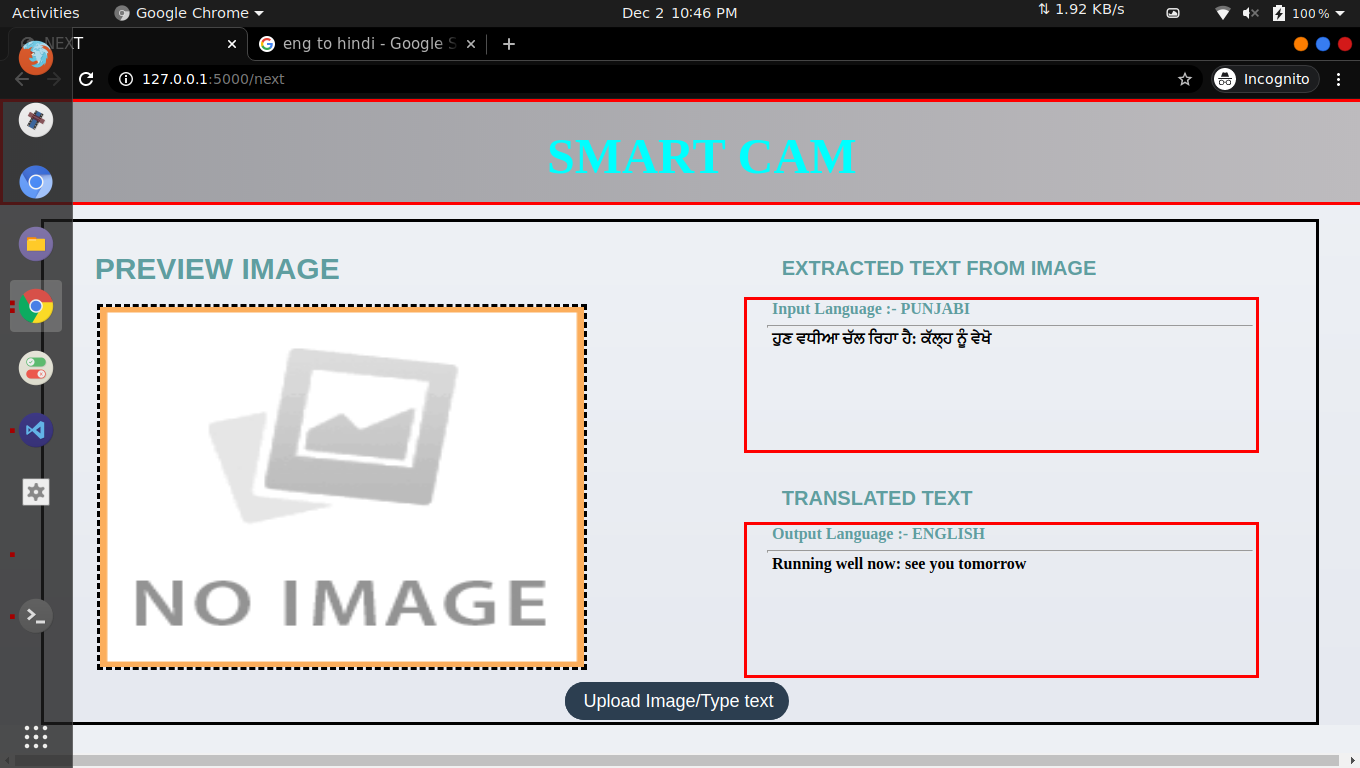
    In this repository we extract text from image using tessaract-ocr and pytesseract and translate text into other language using textblob. and make a web app using flask.

    How We extract text

    1. convert image to grayscale.
    2. Detect edges of images.
    3. Find contour of image(region were text are present)
    4. Extract text region from image
    5. From extracted region we get image data using pytesseract.

    How we translate text

    To transalate text we first we use text blob module it’s auto detect input language of text and translate it into desired language in this repo we translate text into three language. English,Hindi,Punjabi

    Requirement

    Here we use ubuntu 20.04 focal fossa To run this repo on your system you need to download some required module

    1. tesseract-ocr

    In Ubuntu

    sudo apt install tesseract-ocr

    In Windows

    you need to download treeseract ocr from

    https://github.com/UB-Mannheim/tesseract/wiki

    And add this line in methods.py

    pytesseract.pytesseract.tesseract_cmd = r”C:\Program Files\Tesseract-OCR\tesseract.exe”

    1. pytesseract
    2. opencv
    3. textblob
    4. numpy
    5. flask
    6. wekzeug
    7. urllib
    8. os
    9. time

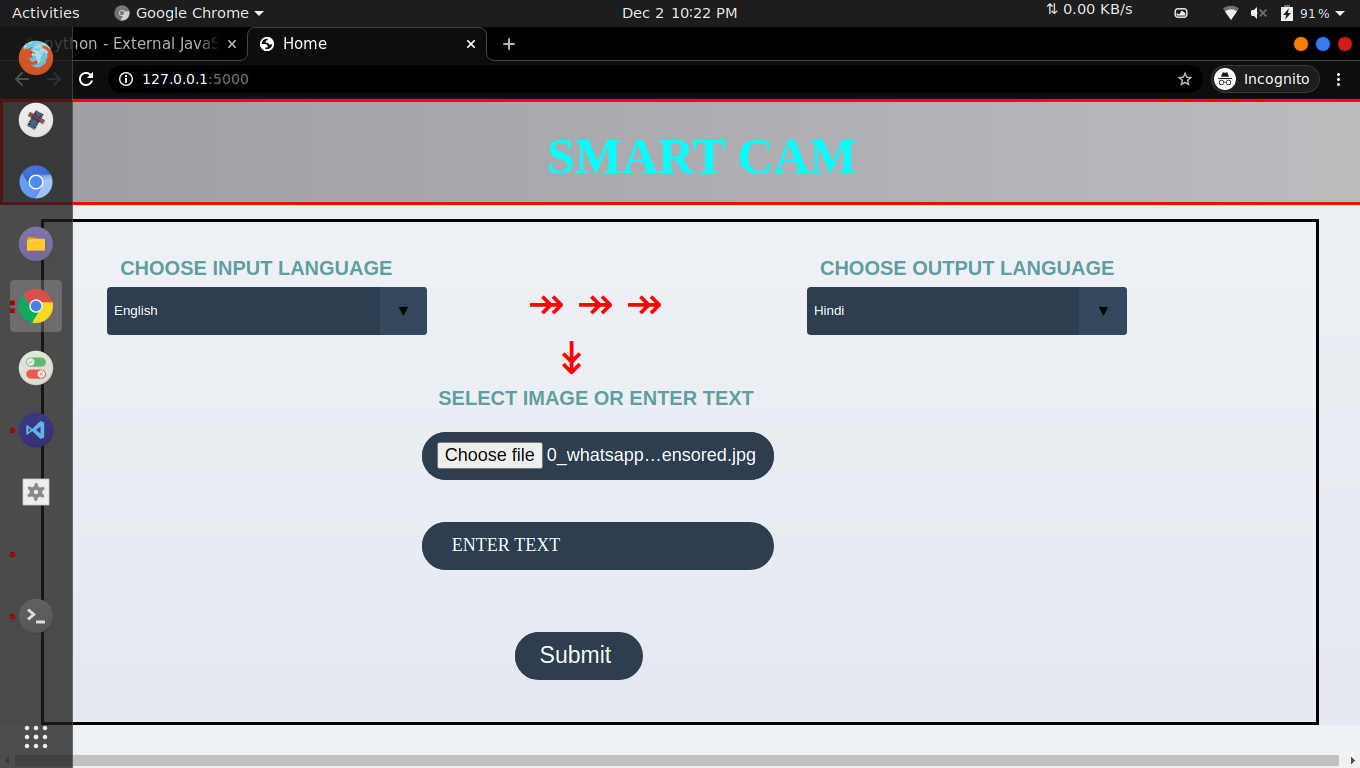
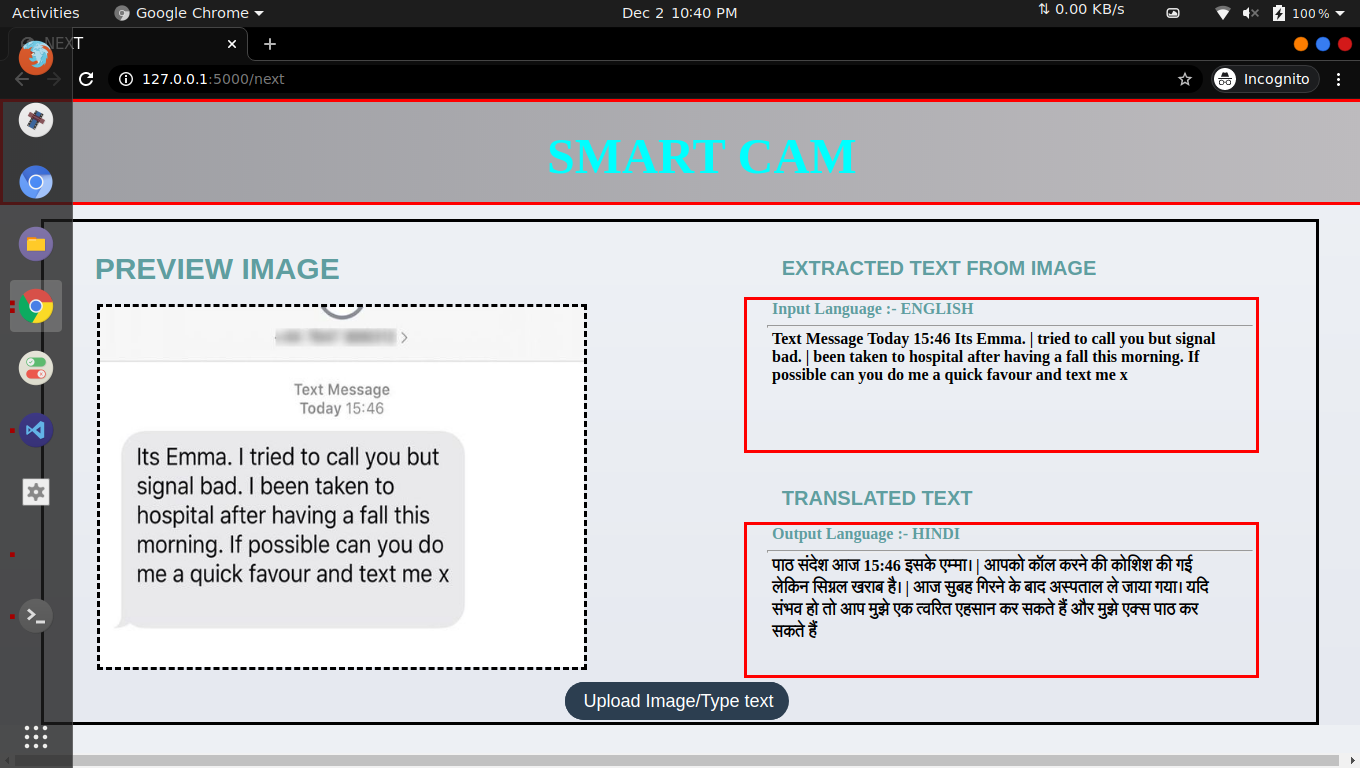
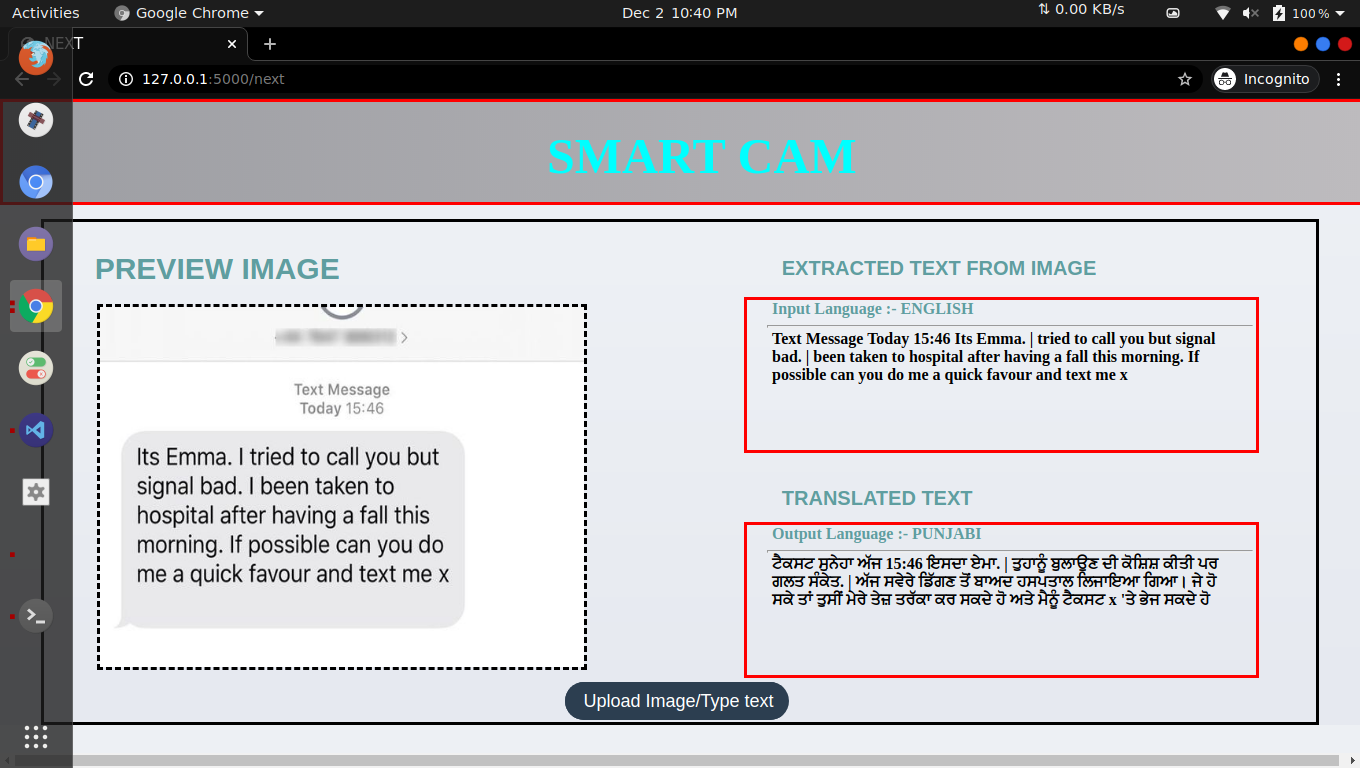
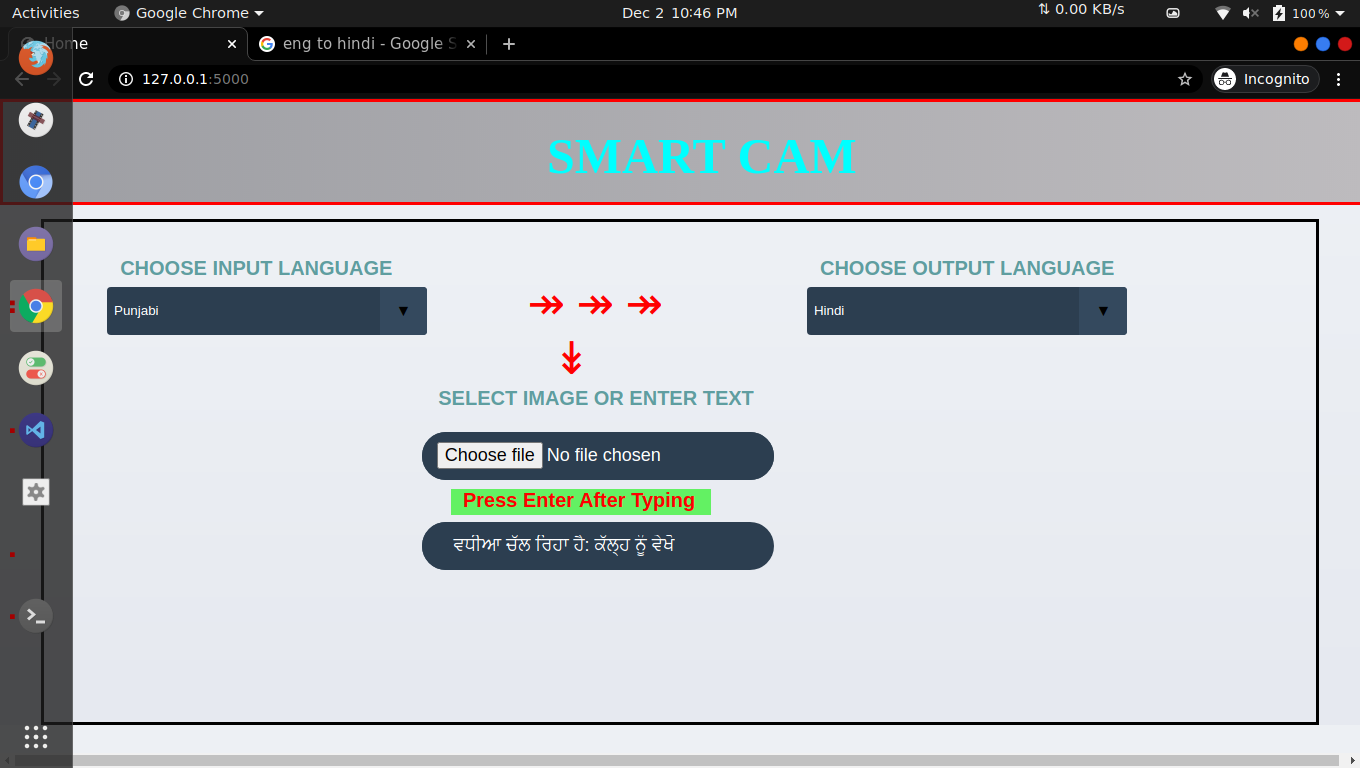
    FLASK WEBPAGE OUTPUT

    Screenshot from 2020-12-02 22-22-41

    Screenshot from 2020-12-02 22-40-26

    Screenshot from 2020-12-02 22-40-49

    Screenshot from 2020-12-02 22-46-11

    Screenshot from 2020-12-02 22-46-22

    Screenshot from 2020-12-02 22-46-55

    Visit original content creator repository https://github.com/aqu9/Smart-Cam
  • package-bno055-demo

    Rotation Sensing Content Demo

    Import

    This package shows how the BNO055 sensor from Adafruit can be used to build content that reacts to rotation changes. Right now it’s a simple video player that endlessly plays a single video and overlays a scaling Hello World text. Of course more complicated integrations could be done. It’s really only limited by your imagination. Here’s a small demo:

    Rotating Video

    Hardware setup

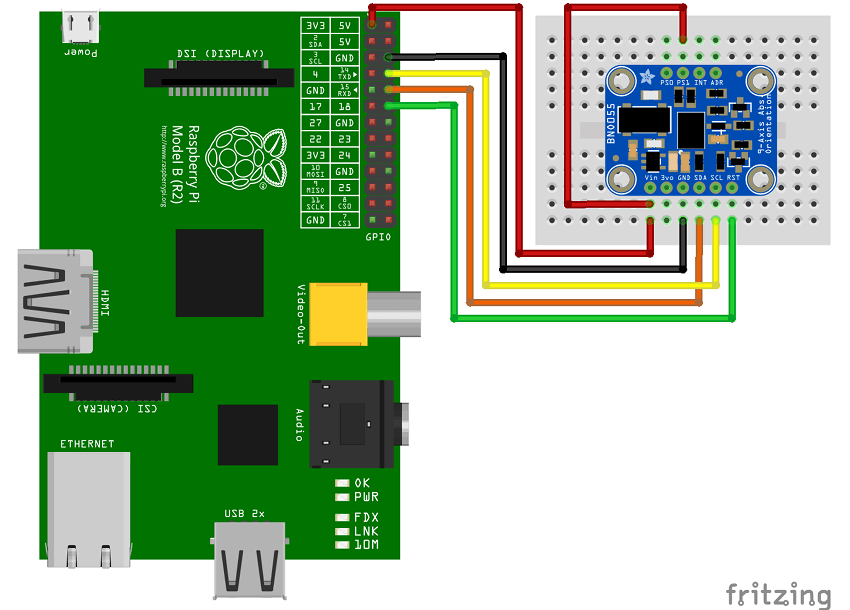
    You can see the required wiring in the following picture:

    Wiring

    If you don’t have a breadboard you can also connect the PS1 input to the other 3.3V output pin on the Pi.

    The package service uses the BNO055.py module. A minor modification has been made so it works with the info-beamer GPIO code in hosted.py.

    info-beamer setup

    You’ll need info-beamer OS version 10 running on your device. Right now that’s only available in the testing channel. You can easily upgrade your device on the device page (Manage > Activate testing channel).

    In addition you’ll need to enable UART. For that create the file config/userconfig.txt on the SD card of your info-beamer device and add the following content:

    enable_uart=1
    dtoverlay=uart1
    

    Once all that’s done, you’re ready to run this package: Import it (just click the import link above) and create a setup. Set a video and then assign the setup to your device. After a few seconds the background service should start running and keep the current rotation updated.

    Visit original content creator repository https://github.com/info-beamer/package-bno055-demo
  • 12oclocks

    12 o’clocks

    This repository hosts a collaborative p5.js port of John Maeda’s 12 o’clocks,
    originally written for Mac OS 9 and released in 1997. Due to the Power PC
    hardware that Mac OS 9 ran on, it is very hard to emulate the original artwork
    and without access to a Mac of the era it is difficult to view. Therefore, we
    are collaborating to bring John Maeda’s 12 o’clocks to the web in p5.js. The
    current version is available to be viewed at this repository’s GitHub Pages

    Resources

    Possibly the most useful resource for this is a post from Golan Levin on the
    12 o’clocks. Golan Levin has created some very useful GIFs of all 12 of
    the clocks in action.

    There is also a useful video on vimeo from John Maeda including each of
    the 12’oclocks in acton (From around 4:00 through to 6:20).

    If you can emulate Mac OS 9 or have a working Mac of the era, the software is
    still available from John Maeda’s website

    Contributing

    It would be great if you want to help out and recreate the 12 o’clocks, or if
    you have any more useful resources for the project. If you are new to git, you
    can check out Git and GitHub for Poets, otherwise feel free to fork this
    repository and create a Pull Request with your changes. Need help? Feel free
    to raise an issue if there’s anything we can help you with!

    Each clock has its own sketch file in the clocks folder, numbered 01 to 12
    based on the position of the clock in the grid.

    Visit original content creator repository
    https://github.com/CodingTrain/12oclocks

  • organization.supply

    CircleCI Code style: black

    This is a Django application that aspires to be a Saas startup, we currently use it for our brewery. The primary goals is to have one simple interface to manage inventory. We build integrations as we require them. For example integration with financial parts or our webshop which runs woocommerce.

    Documentation & landing pages

    Documentation and landing pages work with Github Pages. They are generated from the hugo folder into the docs folder with the docs.sh script. You will need Hugo installed for this to work.

    Development

    It’s a django app, so you will need python and other things installed (all in requirements.txt). Once installed run python manage.py runserver for local development. Code is formatted by black. Which you can run easily after installing with black ..

    Errors are tracked with Sentry. This is configured trough the .env file in which you will need to fill in the SENTRY_DSN variable. A .env.example file is provided.

    A docker-compose.yml file is also available for this stack for development. It runs the application with a Postgres DB instead of a sqlite one. A simple build and up should be enough, you can create a superuser in the python application container. Since it’s storing data, you might need to create a volume with: docker volume create --name=inventory.

    Testing

    Testing is done with pytest: pytest. If you want the coverage reports, run pytest --cov-report html . and look in the tests/reports directory to see the HTML output. The aim is to keep the coverage as high as possible.

    Deployment

    Deployment is done manually for now, on a Digital Ocean droplet.

    License

    GNU Affero General Public License v3.0

    Visit original content creator repository https://github.com/organization-supply/organization.supply
  • rdstail

    Visit original content creator repository
    https://github.com/Instamojo/rdstail

  • virtus-capital-app

    Este projeto da landing page em React é uma proposta de miniprojeto do curso Programadores do Amanhã, do módulo 5.

    🔶 Virtus Capital – Landing Page
    Bem-vindo à landing page da Virtus Capital, desenvolvida com React. Este repositório contém o código-fonte da página, que foi projetada para oferecer uma experiência de navegação limpa e objetiva, destacando os principais serviços e diferenciais da Virtus Capital.

    🏛️ Sobre a Virtus Capital
    A Virtus Capital oferece consultoria financeira personalizada, focada em gerenciar a situação atual de cada cliente, controlando despesas e otimizando receitas. Com uma equipe global de especialistas, nosso objetivo é transformar nossos clientes em investidores inteligentes, oferecendo suporte estratégico e soluções financeiras sob medida para alcançar sucesso e estabilidade financeira.

    ✨ Tecnologias Utilizadas
    React – Framework para construção da interface do usuário.
    CSS3 – Para estilização e layout responsivo.
    JavaScript – Para interação e funcionalidades da página.
    Axios – Para realizar requisições à Personal Finance API.

    🛠️ Como Executar Localmente
    Para rodar o projeto localmente, siga os passos abaixo:

    1. Clone este repositório:

    git clone https://github.com/hewelbelmonte/virtus-capital-app.git

    2. Navegue até o diretório do projeto:

    cd virtus-capital-app

    3. Instale as dependências:

    npm install

    4. Inicie o servidor de desenvolvimento:

    npm start

    A landing page estará disponível em http://localhost:3000.

    🌐 API Utilizada
    Utiliza a Personal Finance API em personal-finance-api-wjui.onrender.com para dados de gerenciamento financeiro.

    🤝 Contribuições
    Contribuições são bem-vindas! Se você deseja melhorar esta landing page, fique à vontade para abrir uma issue ou enviar um pull request.

    Visit original content creator repository
    https://github.com/hewelbelmonte/virtus-capital-app

  • PikaServe

    PikaServe

    PikaServe is a simple to use, no bull-sh*t API endpoint to query data available in pokedex-data.json
    It can be currently queried at https://api.pikaserve.xyz/ Server down until further notice

    Use self hosting guide (below) to continue using the endpoints

    Documentation Development Stage

    Issues License

    API Usage

    Get started by getting a random Pokemon!

    Using the language / framework of your choice:

    Please visit the Wiki for more information and different endpoints

    Why?

    There are hundred’s of pokemon APIs already, with 20,000 ways to use and god knows how much incomprehensible data. This projects aim is to be as simple and straightforward to use as possible. I have a self collected, independent and unique database, which means I have complete control on every step on interaction. Simple enough to be used, forked, edited and self-hosted as per personal preferences, I am are sure this API is for someone out there.

    Active Development Goals

    • POST queries
    • Change host and move to custom DNS (v1)
    • Wiki
      • Add Usage Examples (Needs contribution)
        • Node.js
        • Python
    • Implement basic rate limits (For DDoS protection)
    • Implement dark/light theme for website
    • [WIP] FrontEnd Panel
    • Show closest match suggestions
    • Develop interactions with the different queries
    • Update database to include Gen 8 (Looking for contributors)

    Self host

    Why to self host?

    • You might want to add or modify some endpoints for your specific use case.
    • Biggest advantage will be low latency and you can freely remove the rate limits

    Steps for self hosting

    • Download the release .rar from this link
    Download the lastest release or any other specefic release (upwards of v1.1.2). See Version History for changes.
    • Export the .rar you downloaded using your software of choice
    • Open the terminal in the exported folder or navigate to the folder in the terminal or IDE of your choice
    • Use npm install and wait for the dependencies to install
    • Then do npm start and wait for the script to run
    • Done, now you can query the code on http://localhost:3000/ (http://localhost:3000/pokemon/random)

    To remove/edit rate limiting on self hosted release

    • Open app.js with the editor of your choice
    • Find the // RATE LIMITING START section
    • Edit the values to your requirement
    • To completely remove the rate limiting, simply comment out code section between // RATE LIMITING START and // RATE LIMITING END

    Contributing

    How to Contribute?

    • Make sure that your changes do not conflict with the core files (changing file directories will require a change in all called paths)
    • Follow the original code structure
    • Refactoring contributions are welcome, explicitly mention “[Refactor]” in your pull request
    • Give a few days to review PRs, code reviews are welcome

    See Contributing.md for more details


    License

    GNU GPLv3 © Pulkit Sambhavi Singh (https://github.com/Purukitto/)

    This project was made for educational purposes, do consider supporting development by contributing or donating if you like the project

    Pokémon and Pokémon character names are trademarks of Nintendo and The Pokémon Company.
    Visit original content creator repository https://github.com/Purukitto/PikaServe